The title being full of acronyms, this topic is about publishing Kerberos based websites behind an F5 load balancer, while using Azure AD as the authenticating service. Or in more technical terms, F5 will rely on an external SAML based token to perform Kerberos Constraint Delegation towards a backend server.
Get settled in, this is going to be a long one…. or if you want the simplified version, just go here…
The architecture:
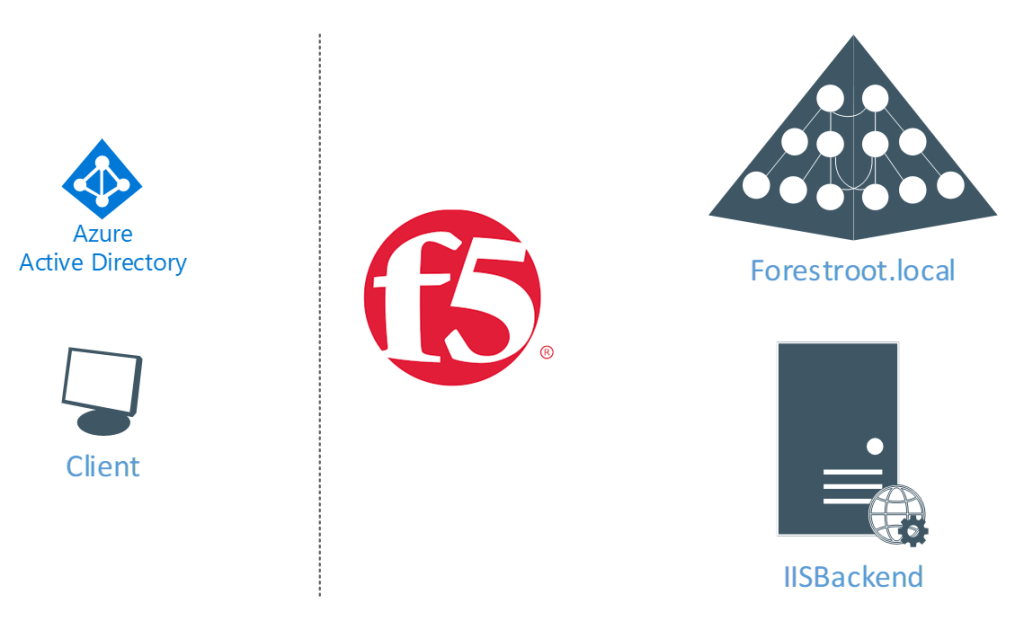
The architecture obviously has an F5 Big-IP device with the APM module loaded, an AAD tenant (with SAML capabilities by using Premium 1 licenses) and the backend IIS server joined to the domain.
The forestroot.local domain synchronizes to Azure AD using AADConnect and users are on a managed and a federated domain.
The backend configuration
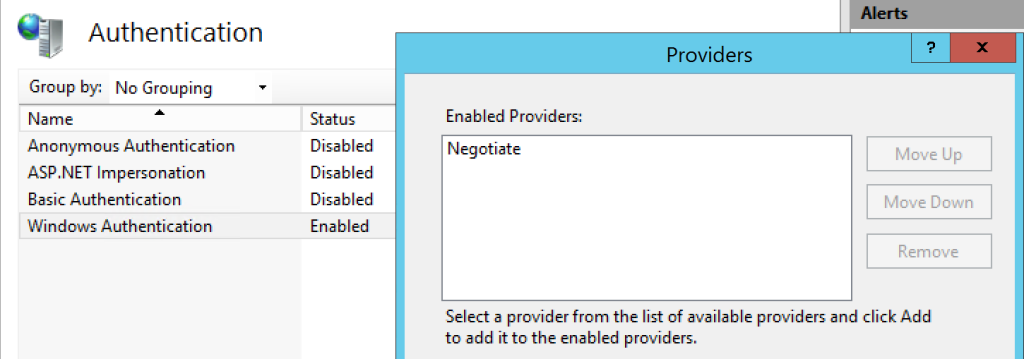
First we start with the IIS webserver configuration. By default, IIS will accept Anonymous access to a website, so we need to disable that.
In order for IIS to support Kerberos, you need to install the Windows Authentication module for IIS through the add-remove roles and features. By default, the Windows Authentication module in IIS will allow you to authenticate through Kerberos and if that fails fall back to NTLM. In my test, I’ve completely disabled the fallback by configuring the module to only support Kerberos which can be done by only selecting Negotiate in the providers list.
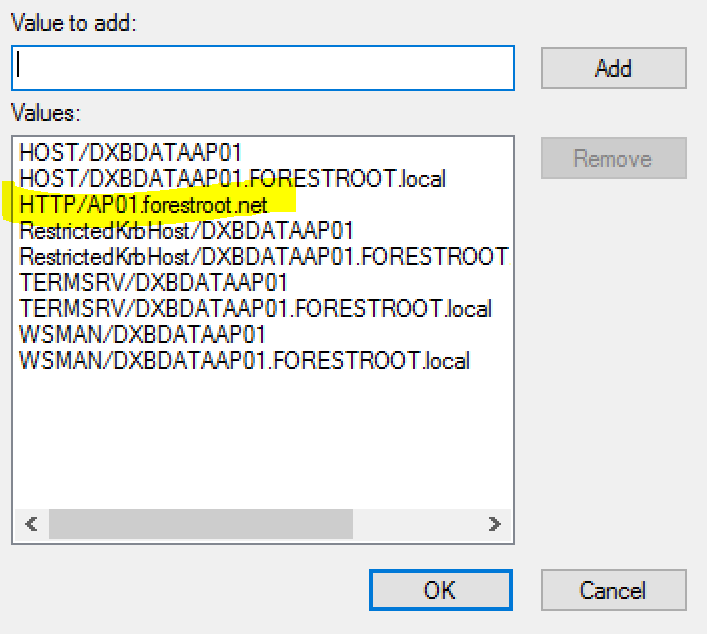
In order to support Kerberos, we need to configure an SPN for the server in Active Directory. By default, the server SPN (Netbios and FQDN) are registered through the HOST alias in Active Directory by default. (HOST/IISBACKEND & HOST/BACKEND.forestroot.local)
But in my case, I wanted to have the webserver be available on the externally accessible FQDN: ap01.forestroot.net, and thus I also added that SPN manually to the IISwebserver computer object. You can add SPN’s through the commandline with SETSPN, but I used the attribute editor in AD Users & Cmputers (advanced view mode) to add them (make sure there are no duplicates!)
If you are running a website on multiple servers using load balancing, make sure the website identity runs under a service account (gMSA if possible) and register the SPN on that object. Make sure to disable kernel mode in IIS (and see the note later in the KCD configuration in F5 for the SPN Pattern – see the orange text for more info on that)
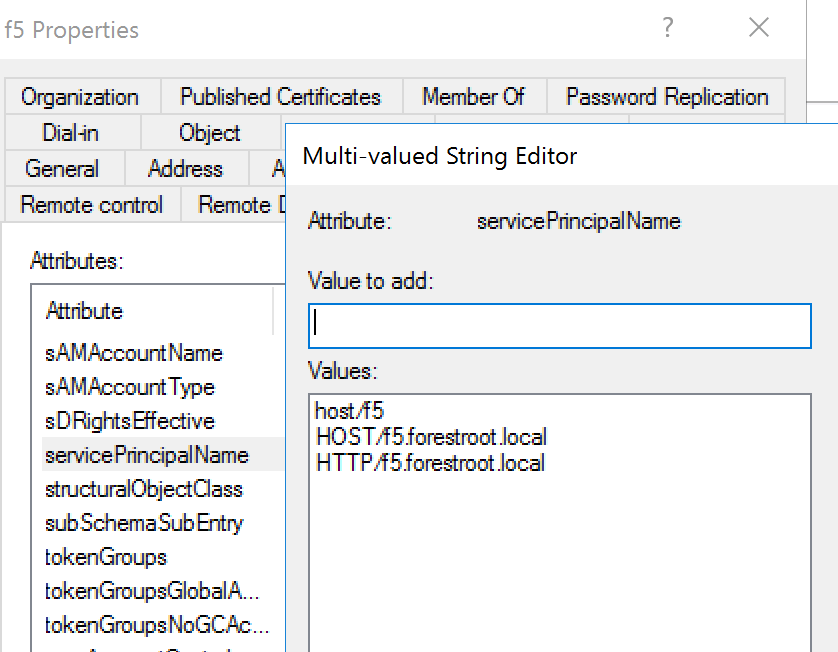
Next is the F5 configuration in Active Directory. In order to enable KCD, F5 needs to have a user account it can use to request Kerberos tickets on behalf of the user. F5 does not support MSA’s or gMSA’s so create a standard user (the user is created is host/f5@forestroot.local), give it a complex password and then, through its properties (enable advanced view) go to the servicePrincipalNames field of the new user and add HOST/F5, or add it through setspn. The APM module of F5 will use the set SPN to perform the impersonation.
Setting an SPN on a user object, will enable the delegation tab on the user object in AD. Go to the delegation tab and enable Kerberos Constraint Delegation for Any Authentication Protocol and in the target, select the server running the IISBackend website, or in the case of a service account, select the service account. Make sure to select the http/kerberostest.forestroot.net. In my case I was running multiple tests and also added the HOST/Server object.
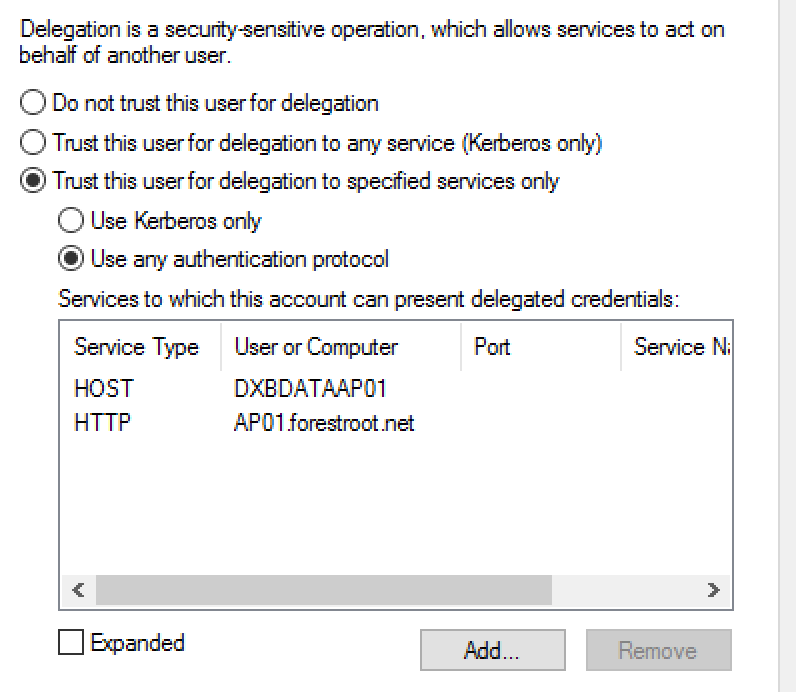
If you don’t fill the APM SPN Pattern, you must add the HOST/Server and HOST/Server.domain.bla SPN’s as this will be used by default in F5 (see note below in red) and the URL based SPN will be ignored completely.
DNS Configuration
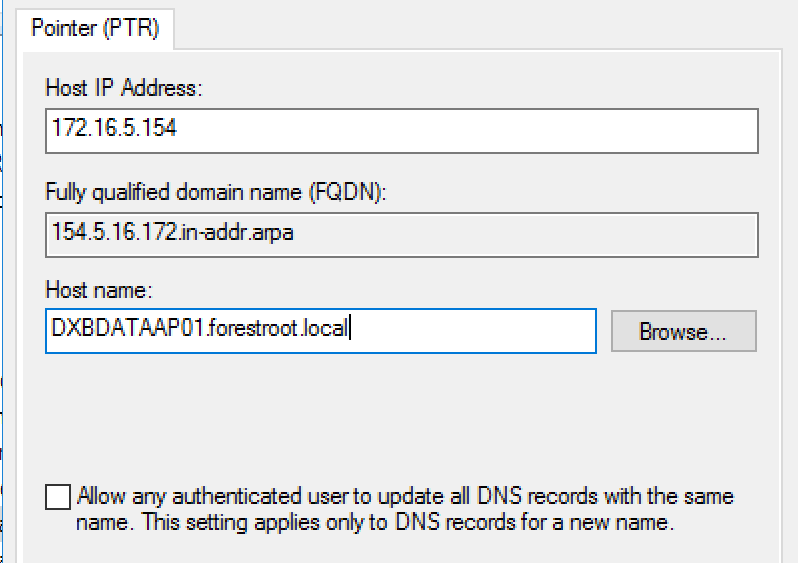
(If not changing the SPN Pattern on the APM module) We need to ensure F5 is able to find the server based on the IP address for the Pool. Basically what happens is that F5 searches for the IP address of the server to find the servername to be able to provide the KCD itself. In order to help F5 do this, we need to configure the DNS server in AD with a reverse lookup zone and in that zone, publish the IP address of the backend webserver and its original object in the forward lookup zone.
If you don’t already have a reverse lookup zone, create one and give it the IP subnet of your web server. In my case I’m running 172.16.5.0/24 and thus I created:
5.16.172.in-addr.arpa And in there a new object:
This concludes the backend services configuration.
AAD Configuration
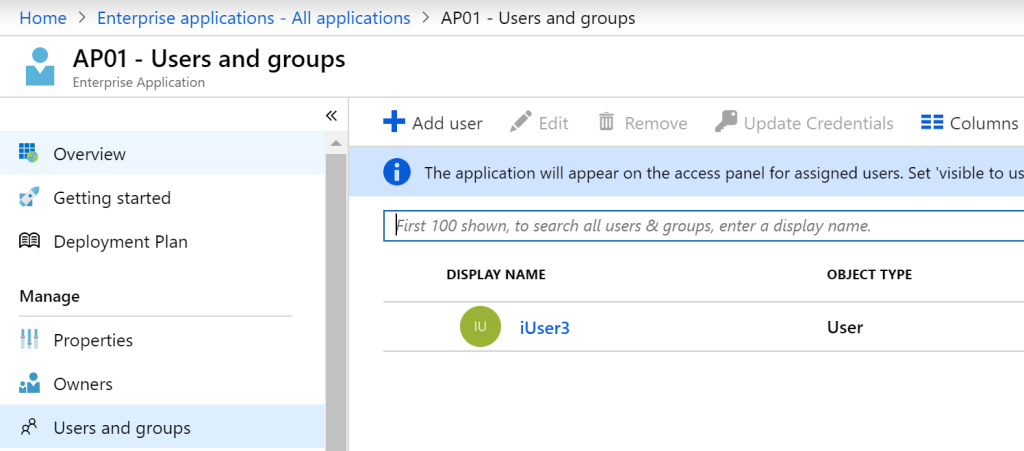
As AAD needs to provide the token for the F5 APM module, we need to create an application in Azure AD. Go to Enterprise Applications, register a new application (create a non-gallery application). Give the application a name and click Add.
Add the required users to the application by selecting Users and Groups and then Add
Then on the sign-on tab click SAML. On that page, scroll down to the SAML Signing Certificate section and download the Federation Metadata XML.
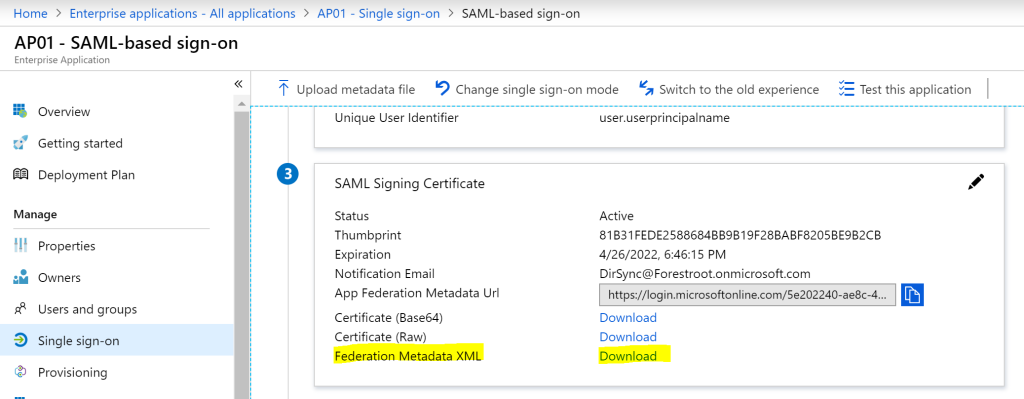
Save the file, as we will need it later-on.
F5 configuration
F5 BIG-IP has multiple modules. Your license determines which modules can be loaded, and after activating the modules in the system they can be configured. In this example I’m using the default load balancing modules + the APM module.
The APM module in F5 allows you to do multiple things. It allows input (SAML, Basic, certificates) and output (Basic, NTLM, Kerberos, Custom). In this case not only do we want to authenticate with SAML, but we also want to enable Kerberos in the backend.
We need to configure a few items in the APM module. First we need to enable it for Kerberos SSO, secondly we need to connect it to our Active Directory to perform LDAP lookups and lastly, we need it to accept AAD SAML tokens for authentication.
The Kerberos SSO configuration
For this we need to configure the SSO module. Go to Access -> Single Sign On -> Kerberos. Add a new Kerberos provider by clicking Create on the right top. Give the profile a name and fill the fields and make sure to change the User Realm Source to:
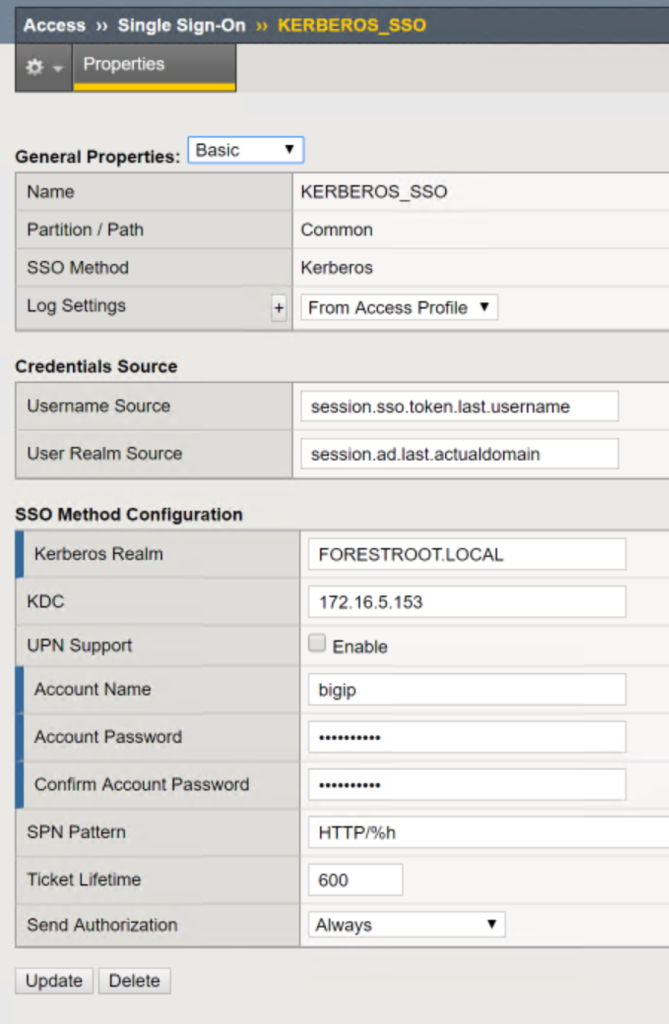
- User Realm Source: session.ad.last.actualdomain
Note: by default, F5 will perform a DNS reverse lookup to get to the SPN of the backend server. For this, the SPN Pattern field (empty by default), uses a lookup of HTTP/%s@REALM, where %S is the servername derived from the DNS reverse lookup of the published IP address of the backend server. Wow, that was a long sentence. In short, when you create the VIP on BIG-IP you define the backend pool (or single server) as IP addresses. Say for the backend server you use 172.16.5.154: Upon using KCD (in the default configuration) it will try to perform a DNS reverse lookup for 172.16.5.154, find for example DXBDATAAP01.forestroot.local and it will use SPN: HTTP/DXBDATAAP01@FORESTROOT.LOCAL (the last part is from the Kerberos Realm field) to perform the KCD against.
This has a few (read a lot) of disadvantages, but for unsuspecting Admins it has a few advantages (as in, it works by “magic”). You can only run single server websites that use Kernel mode or the SPN is registered on the computer object. While that’s all nice and fine, many websites are load balanced, or use a service account without Kernel mode. In that case, we want to ensure we request a KCD based token on the incoming SPN registered to the URL, not the servername. In order to do that, we need to change the SPN Pattern to HTTP/%h@REALM
Setting the %h value in the SPN Pattern field will disable the reverse DNS lookup, and search directly for the SPN in AD, and therefore request a token based on the service account running the website.
Note2: The Send Authorization : Always, does not always work. Some webservers require a the Kerberos token as a response on a 401 (access denied) page. If your configuration does not work with the “Always” setting, set this to “On 401 Response”
LDAP / Active Directory Configuration
Next is the AD configuration for LDAP queries. Go to Access -> Authentication -> Active Directory. Click Create to create a new entry:
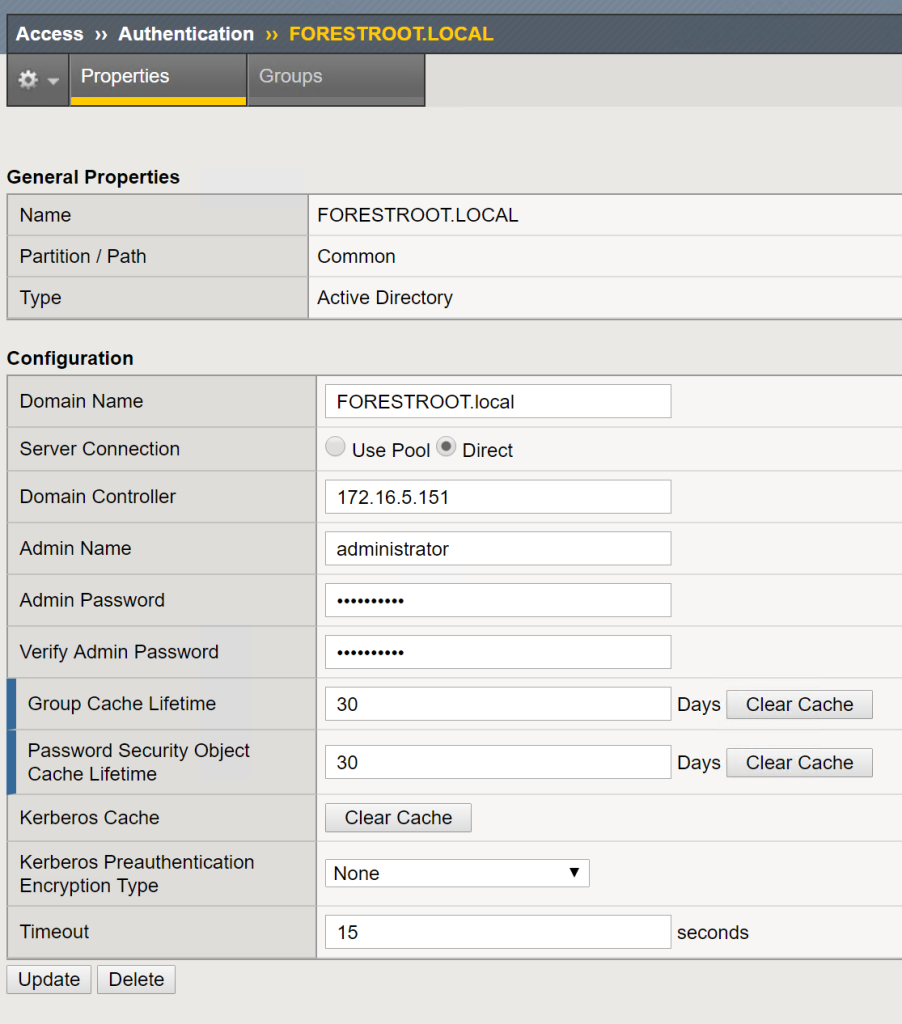
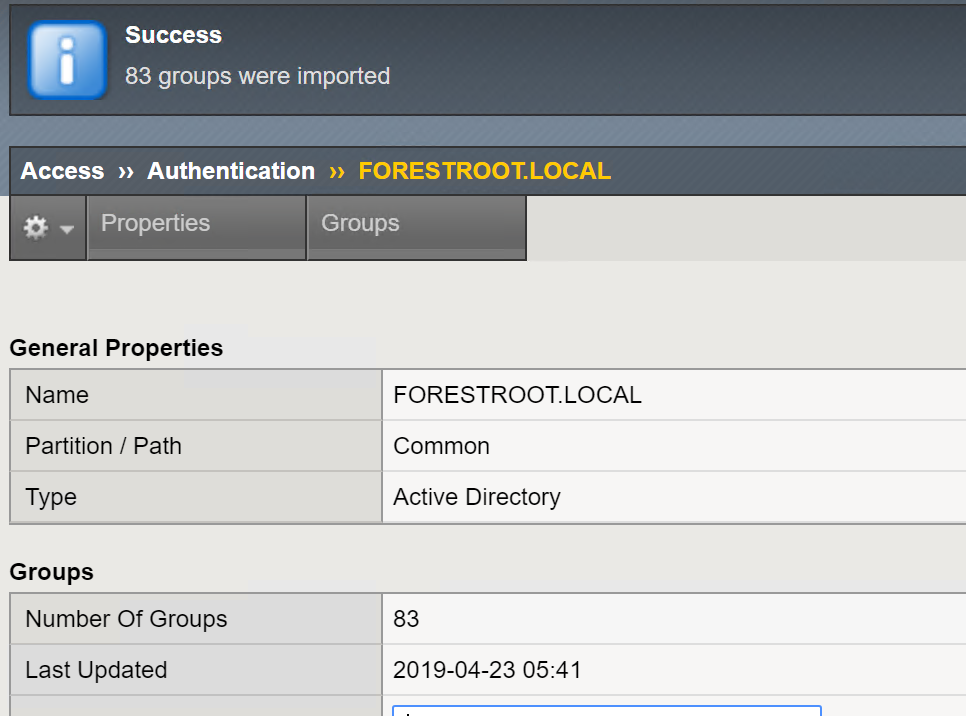
Here, the F5 account will not have enough rights by default. Hence I used the built-in Domain Administrator account, but obviously I do not recommend using that one and providing a regular account with the minimal rights required to perform the LDAP query. In order to test if the LDAP query can be done, switch to the group tab and select Update to see if all the Domain groups are populated.
Adding AAD as IdP provider
For the Federation configuration, we need to do some trickery. It seems, the APM module uses 2 configuration items to make this all work. First there is the external IDP provider and secondly there is the SP provider. While the first one seems to be “just AAD” without any application and the second one is the actual application for that Federation provider. AAD works a bit differently. In regular configurations (such as ADFS) you indeed have 1 ADFS Identity Provider configuration and then an additional configuration item for the application inside ADFS. But with AAD, these are combined. So we need to load some stuff twice.
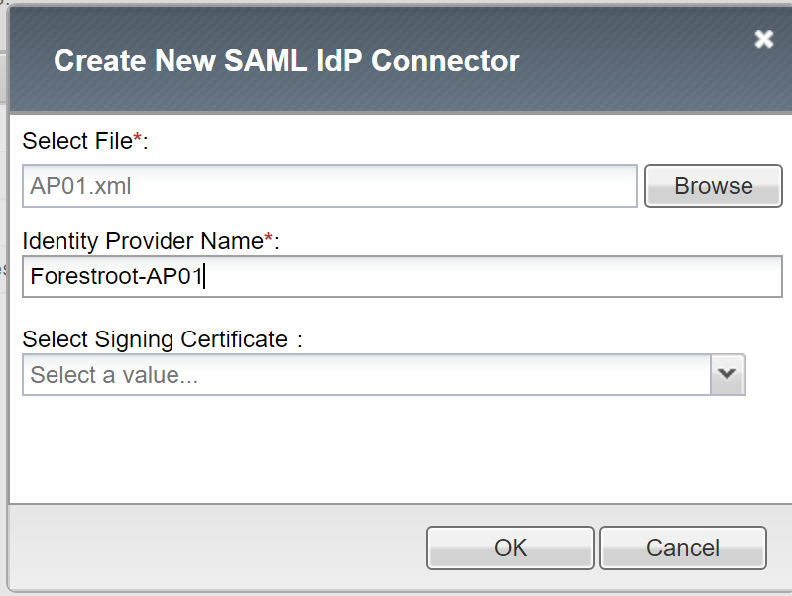
First the identity provider. On the APM module, go to Access -> Federation -> SAML Service Provider -> External IDP Connectors On the right side of the window, click Create from Metadata
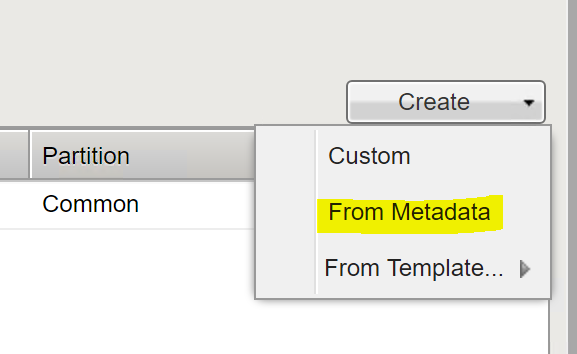
This will bring up a window. Give the new IDP a name (give it the name for the application registered in AAD for clarity and load the XML file from the app created. As the Certificate information is inside the MetaData, there is no need to upload it seperately.
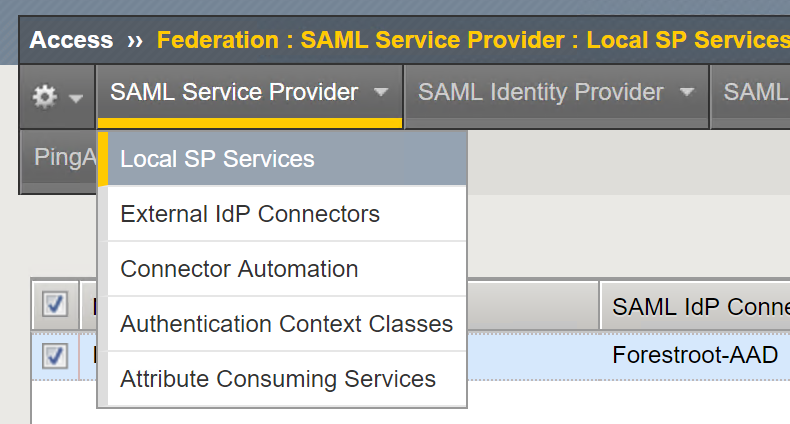
After the IDP is created, under SAML Service Provider, select Local SP Services:
Create a new service and ensure you configure the right URL:
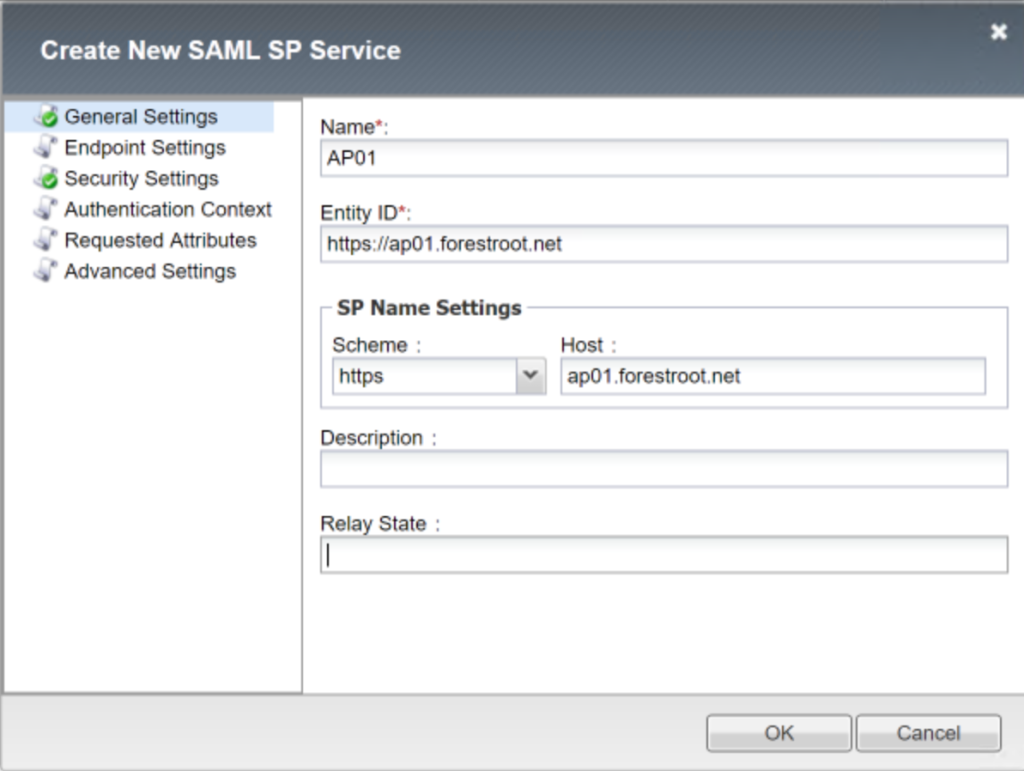
The URL is the actual URL that will be configured in AAD and users will be redirected to. After creating the application, click the export metadata button and save the file, we will need to import it later back into AAD.

And then select the Bind/Unbind IdP Connectors button. A new Window will open. Select Add a Row and select the newly created IdP Connector. For the matching source type: %{session.server.landinguri} and for the matching value, type an /
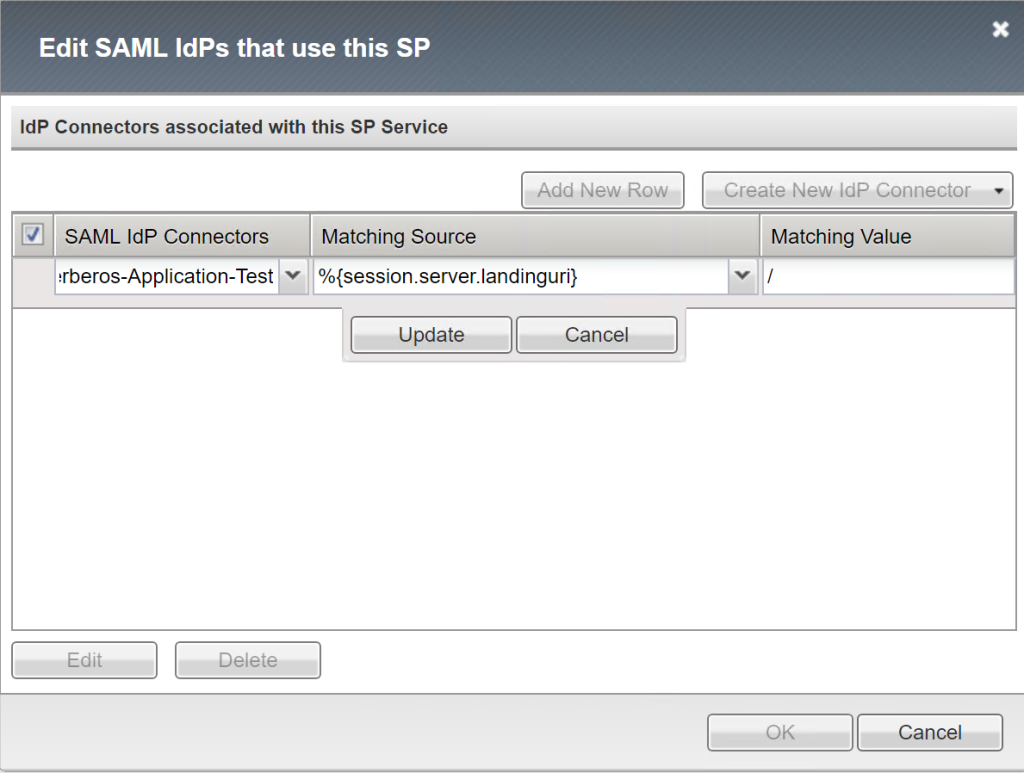
Click update, and then click ok.
Creating an access policy
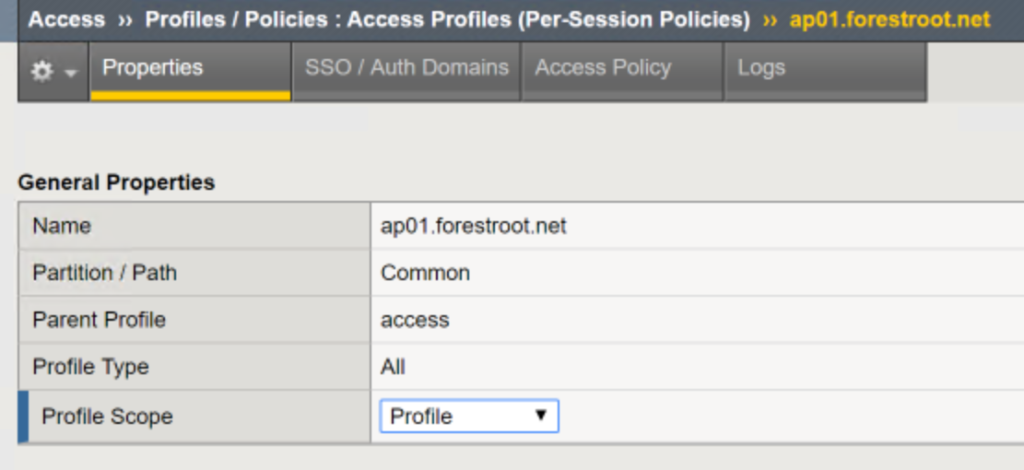
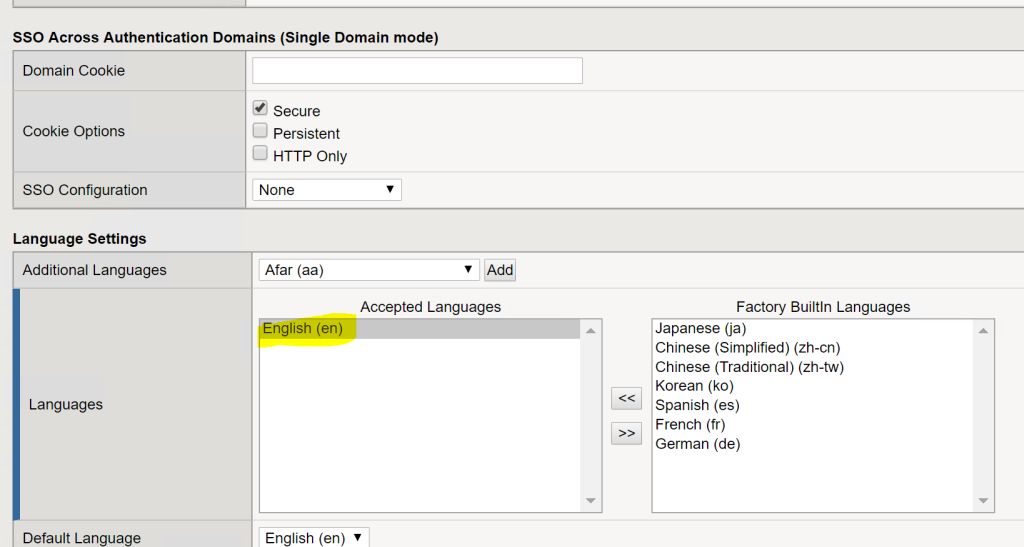
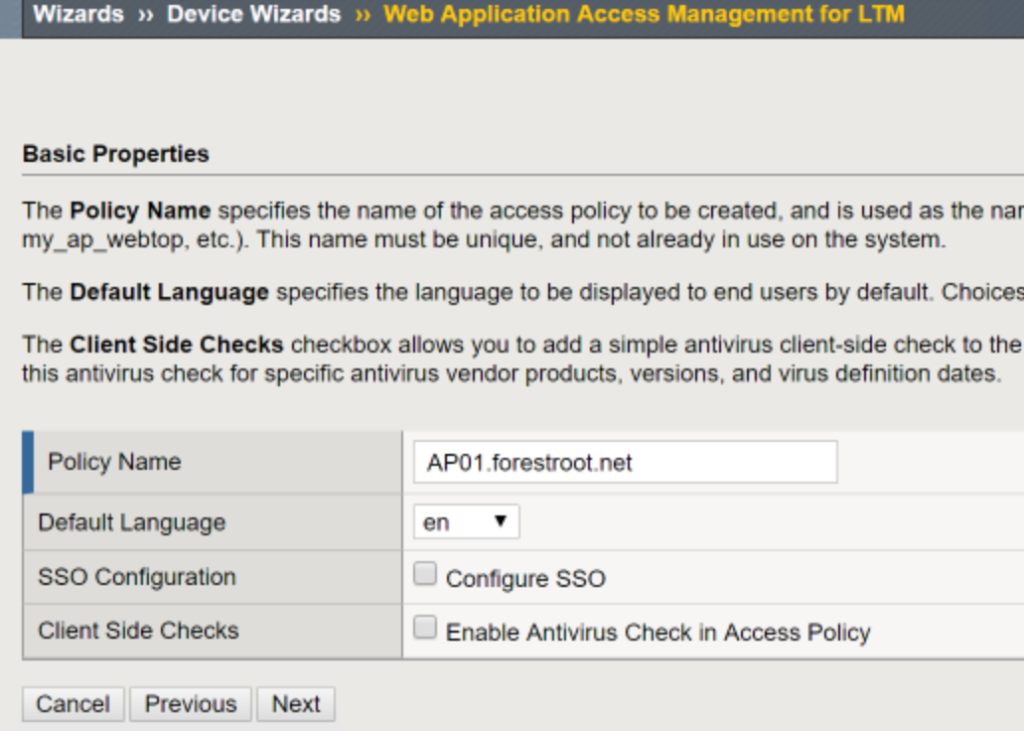
Once we have the configuration set, now we need to configure an access policy that indicates how the configuration items will work together. Go to the Access module, select Profiles / Policies and select Access Profiles. Create a new one and give it a name (I used the same name as I had for my app. We cannot reuse the created IdP’s and SP’s between applications anyway, and this clarifies that this access policy is just for this app) and set the profile type to all. Under languages select English (or any other you like) and click Finished.
First, we will be enabling the SSO configuration, so that the profile knows it needs to include the SSO modules (and actually use KCD). For this, open up the just created profile and select SSO / Auth Domains. Then under SSO Configuration, select the earlier created Kerberos Profile.

Next, go to Access Policy and click Edit Access Policy for … <name of your profile> A new window will open with just Start-Deny as options. This is where the hard part will need to happen. First we will need to extract the SAML token to get the UPN of the user logging in; Click Add New Macro and select BIG-IP as SAML Service Provider
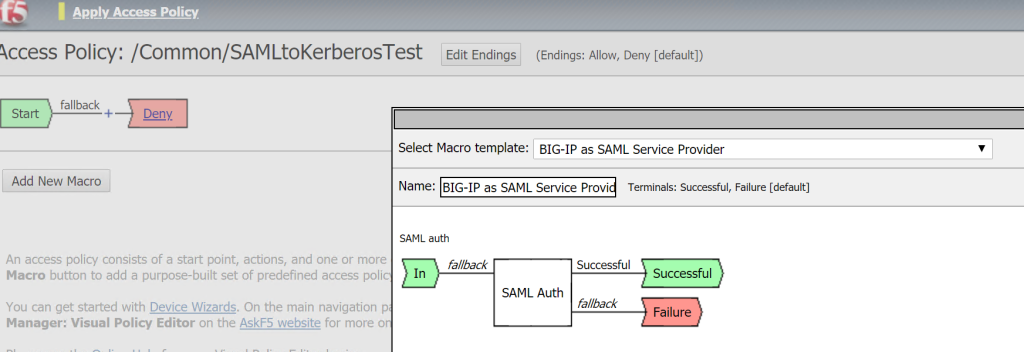
Click save to add the macro.
Next, click the + sign after start. A new window will open. Click Macros and select the BIG-IP as SAML Service Provider and click add item.
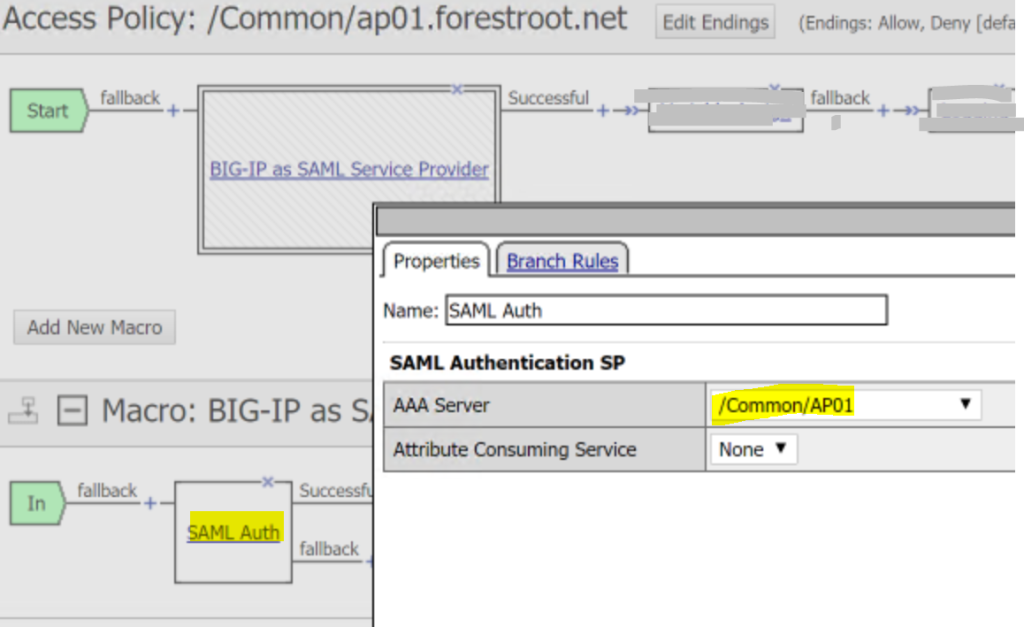
In the same window, under the Macro templates, now expand the SAML auth provider and open the properties of the SAML Auth and set the AAA server to match the AP01 (or your application’s SP name):
NOTE: Due to the new claim rules in AAD, it is possible to super-simplify the next parts. Please see the (soon to be released) update on this post – where we use session.saml.last.attr.name.Identity for the Kerberos SSO object – which negates everything in this chapter below this point. Just click save and Apply Policy (no need to add the other parts) – and continue with “publishing the web site“.
On the successful part (top level), click the + sign to add a Variable through the Assignment tab:
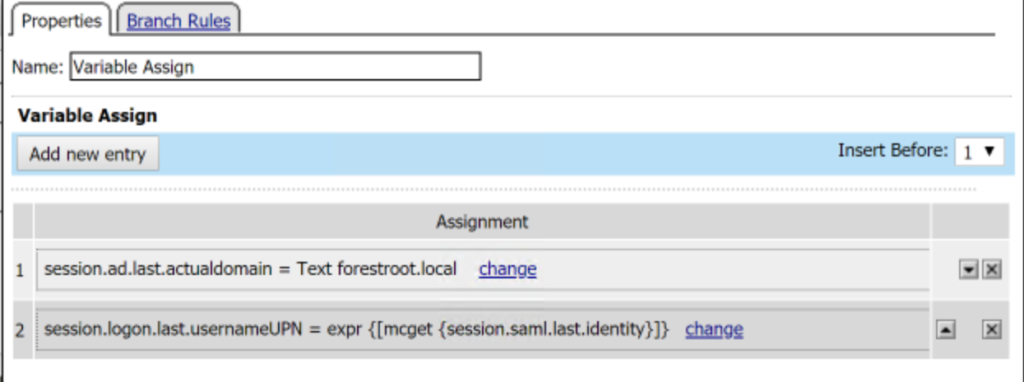
There will be two variables; the first one set’s the user domain to the backend domain name (forestroot.local)
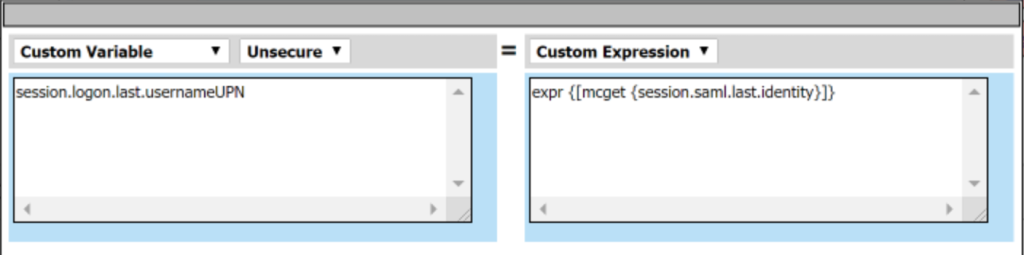
and the 2nd one actually sets the UPN of the user in the SAML token as the session.logon.last.username. The two entries must be entered as follows:
session.ad.lastactualdomain = <your domain FQDN>
session.logon.last.usernameUPN = expr {[mcget {session.saml.last.identity}]}

ext is the AD Query that we need to do. We can’t get a KCD token based on the UPN through F5. The SSO module only allows authentication using the sAMAccountName. As a result, we need to query the sAMAccount attribute for the UPN retrieved.
Press the + sign after the variable (Retrieve UPN from SAML token) assignment and add the AD Query object from the Authentication tab.
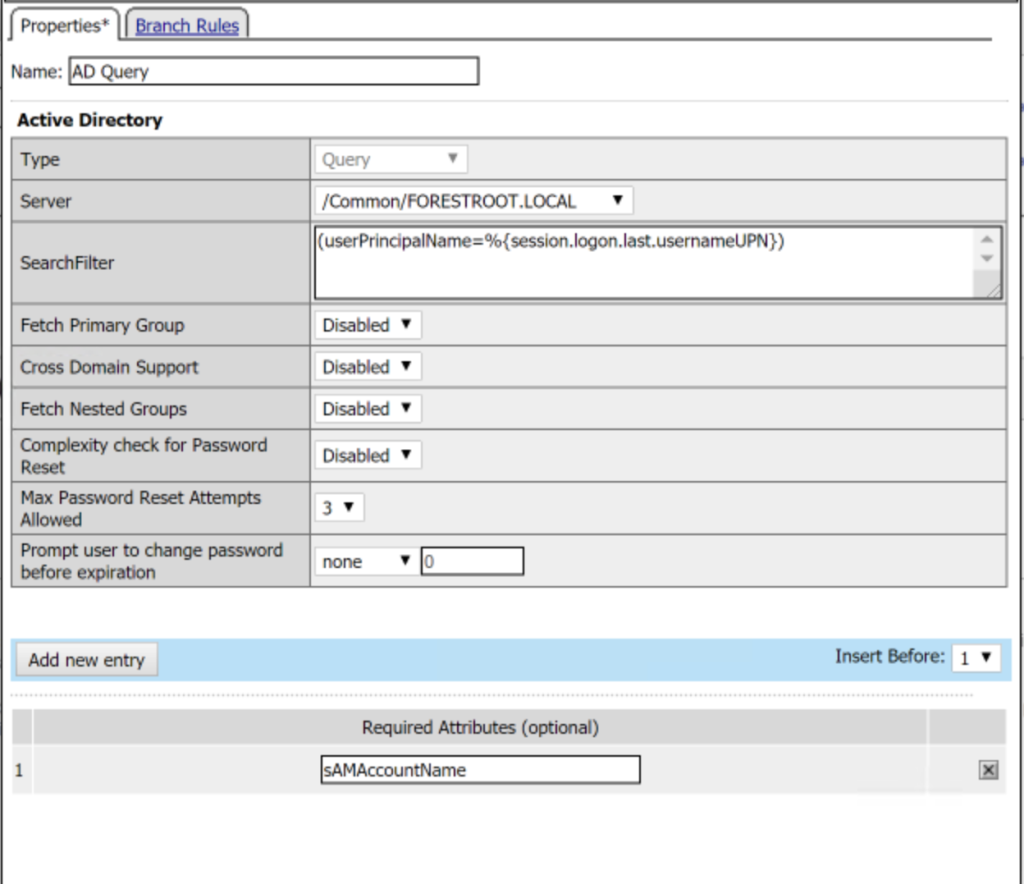
Set server to match the just created AD object and then set the search filter to: (userPrincipalName=%{session.logon.last.usernameUPN}) and from the required attributes, removes all except for sAMAccountName.
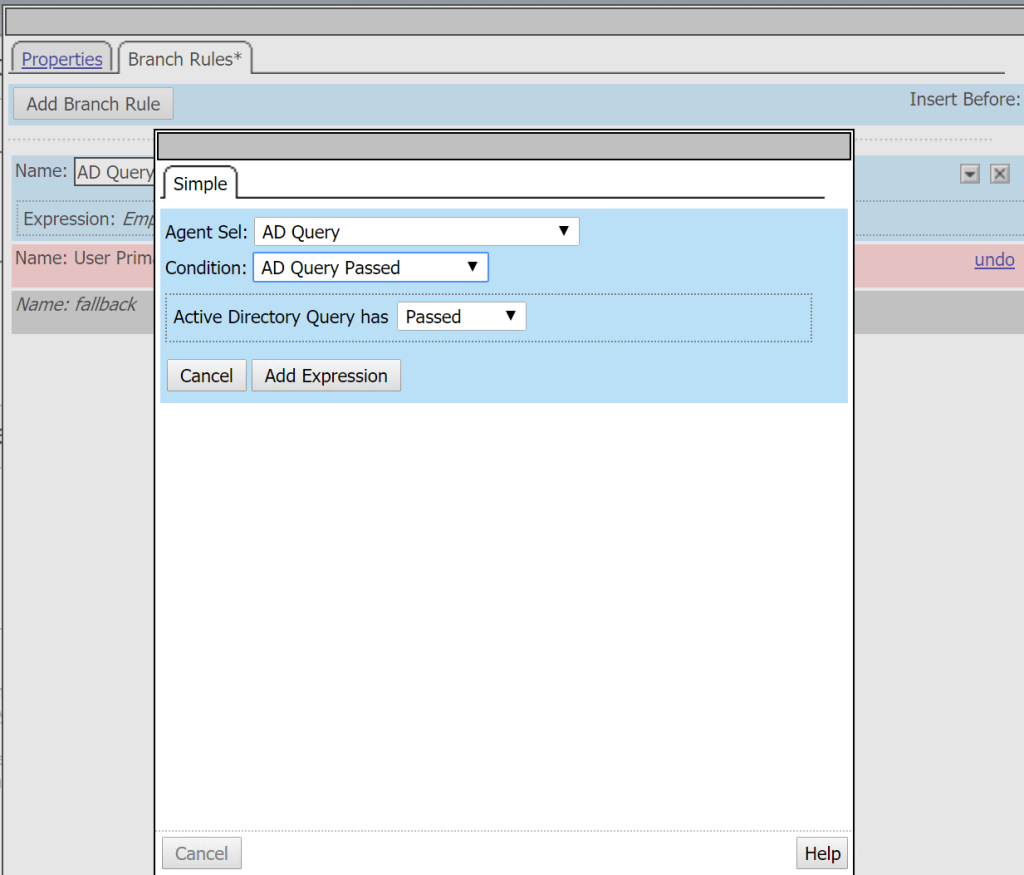
On the branch rules tab, remove the existing rule and add a new rule. ON the Agent Selection, set it to AD Query and set the condition to passed and add the expression.
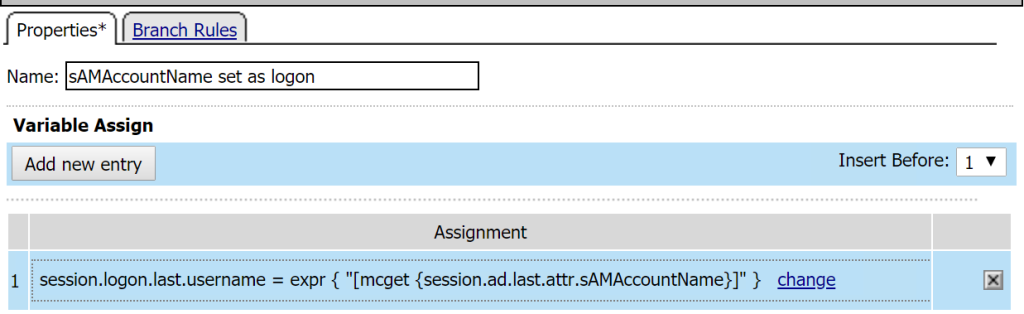
Now that we have the user sAMAccountName attribute, we can set the logon as a variable again to reuse it later-on in the SSO module if your config requires that. Click the plus sign after AD Query Success and add a Variable Assign from the Assignments tab. Add an assignment as per: session.logon.last.username = expr { “[mcget {session.ad.last.attr.sAMAccountName}]” }
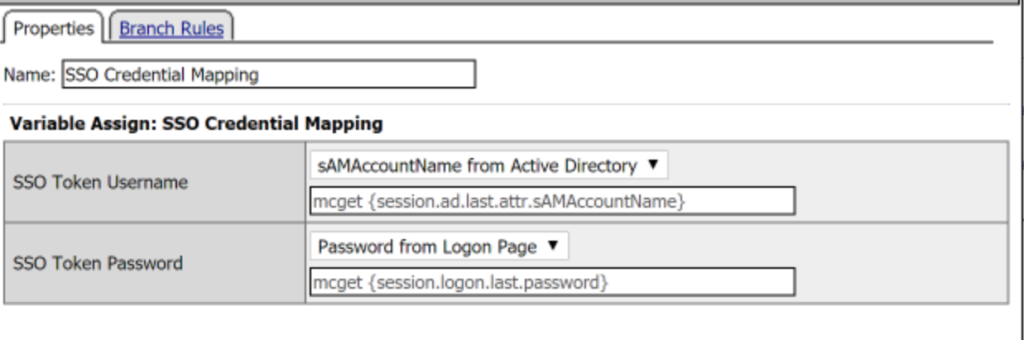
After the variable assignment (sAMAccountName set as logon) click the +. From the Assignment tab, select SSO Credential mapping and click add Item. If you have set the sAMAccountName as per the instructions below, just add it and click save. Or if you did not set the variable, change the SSO token Username to sAMAccountName from Active Directory:
Finally, click the fallback after the SSO Credential mapping, and change the entry to match Allow

Click Apply Access Policy and close the editor. To enable the publishing, activate the policy by clicking on the Yellow Access Policy text in the upper left corner of the screen.
Publishing the website
Last but not least, the Traffic Manager Profile (or publishing the backend webserver)
You can manually create the server entry, but in my case, I use the device wizard. Publish a Web Application and on the Wizard give the entry a name. Disable SSO and AntiVirus.
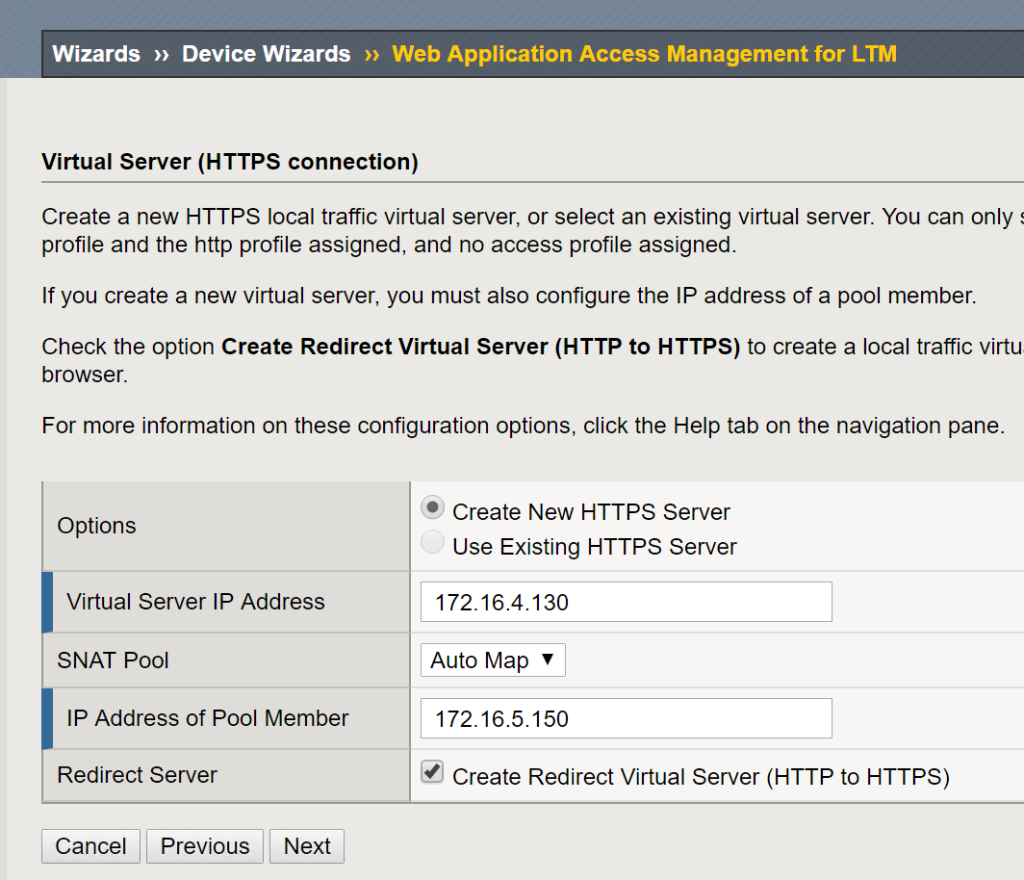
On the authentication page, select the AAA server created (Forestroot.local) and click next to provide the external and internal IP for the publishing.
Then review and create the configuration.
Next, go to local traffic, open the properties for the virtual server and replace the certificate to ensure you have a proper SSL (import the certificate PFX under System -> Certificate Management -> Traffic Certificate Management -> SSL Certificate List first)

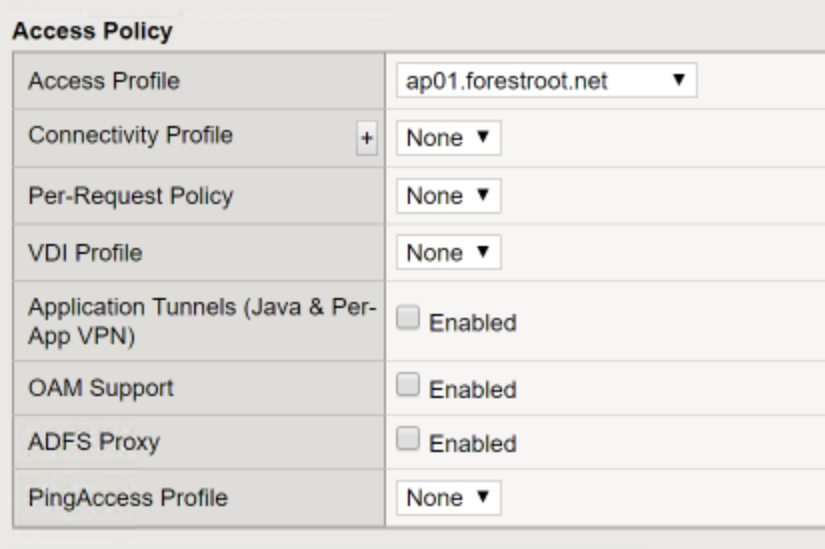
Secondly, to switch Access Policies (to use the one we created earlier and not the default one created by the wizard, go to Access Policy and change the entry to match your manually created policy:
Save the configuration
Back to AAD to import the XML
In Azure AD, go to the created application and select the Single-Sign-On option again. Click SAML and then click Upload Metadata File and upload the xml downloaded from F5 (SP)
Upload the file, and then on the overview page, select save.

Testing
In order to test the publication you need to point the external URL (ap01.forestroot.net in my case) to the external IP address (172.16.4.130 in my case). Also make sure the test client has internet access. You can point the client to the website by either publishing it fully on public DNS, but in my case, I just added a hosts file on one of the clients.
Once you try to browse the URL, you should be immediately redirected to login.microsoft.com for AAD credentials. If that all works, you are redirected back to the kerberostest URL on https as this is in the configuration in AAD. Obviously it is also possible to go to the application through myapps.microsoft.com.
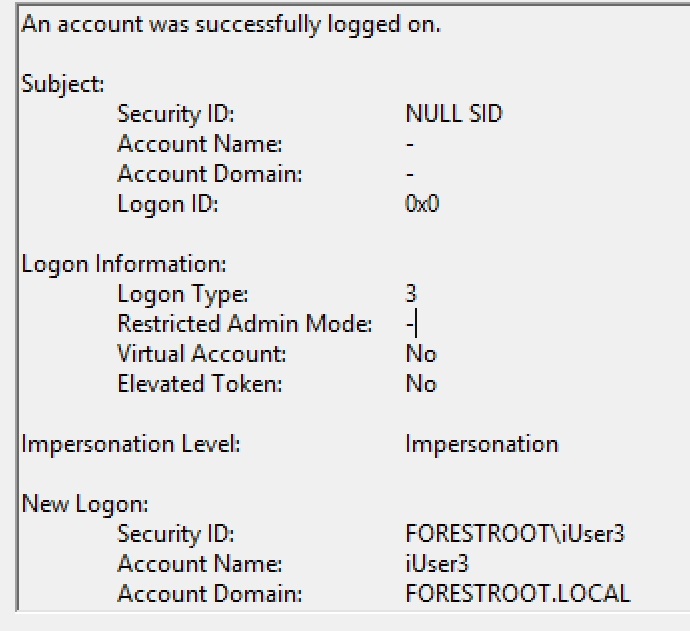
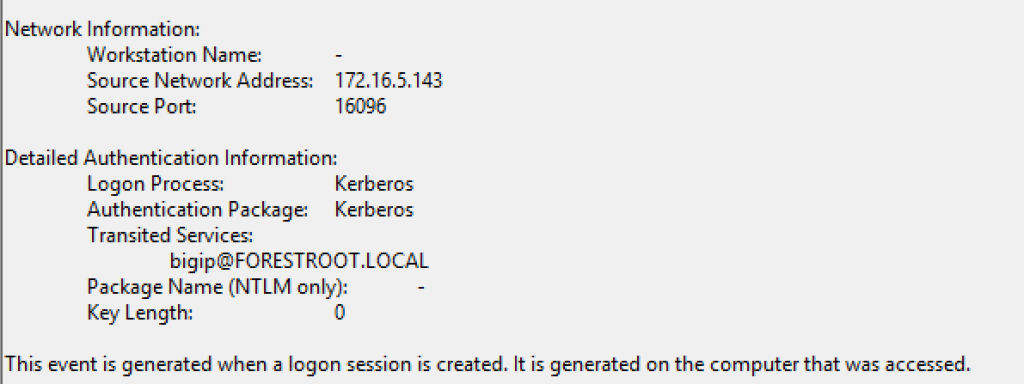
Validation can be made by looking at the webserver security log and check for a login (with Kerberos) from your AD user:
In case you want to see what is happening, go to Access, and select the current sessions option. Clicking on the session shown will give you the session information including the access policy workflows. As you can see from below, my BIG-IP wasn’t able to perform a reverse DNS lookups and this is noted in the logs. Prior to re-testing, make sure to kill the session for the test user by again going to Access – Current Sessions.
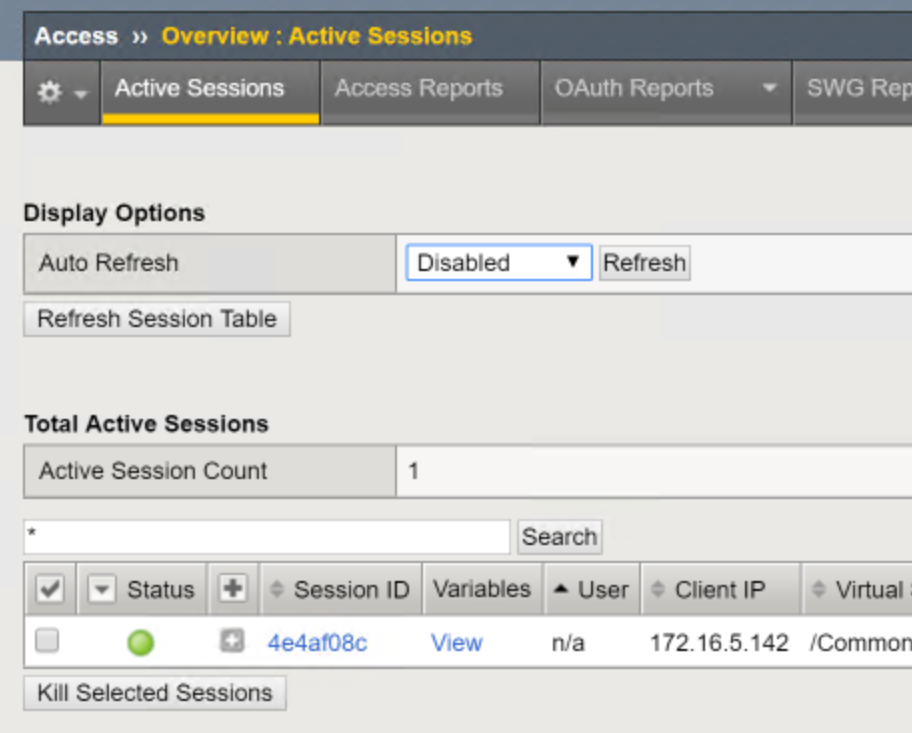
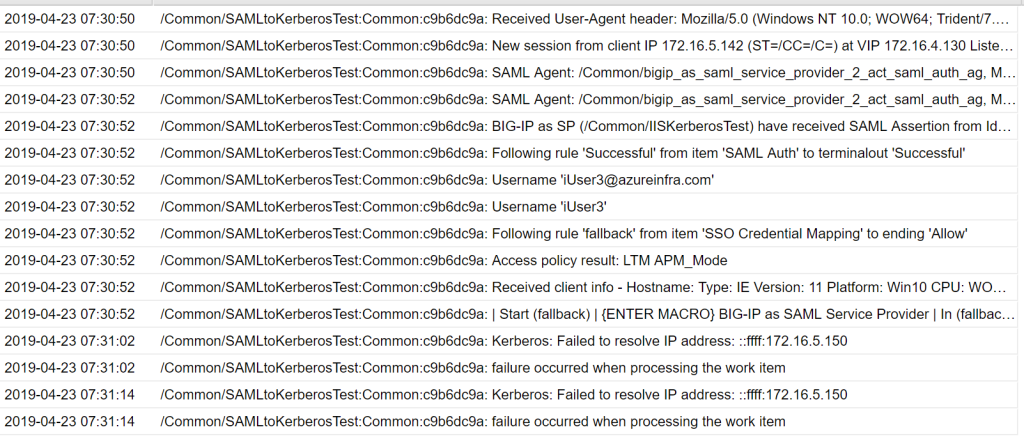
So in my case, the DNS servers (under System -> DNS) wasn’t configured correctly and after fixing that it worked.
Conclusion
So in short, it is possible to perform KCD on an F5 with AAD as the authenticator (IdP). It takes a bit of testing, playing around an putting in some variables, but in short it works. This allows you to perform conditional access rule access, SSO capabilities based on AAD and much more!.