When you have your Azure Stack Development Kit, you might want to show it off to your customers or simply change the external IP address for some other reasons.. as we have seen earlier there is a dual NAT mode inside the Azure Stack Dev Kit box. The AzS-BGPNAT01 VM receives an external IP address that it NAT’s into the 192.168.200.x range. And then behind that is the “public IP” address range for the subscriptions (192.168.10x.x).
When you change the external IP range on the box (because of DHCP) the BGPNAT01 router does not update the NetNat configuration by default and thus you are stuck with a non-working box. The official way of re-IP’ing this all is probably a full reinstallation of the Azure Stack Dev Kit box. But there is a faster way to update the NAT configuration on the AzS-BGPNAT.
But first let’s take a look what we are talking about:

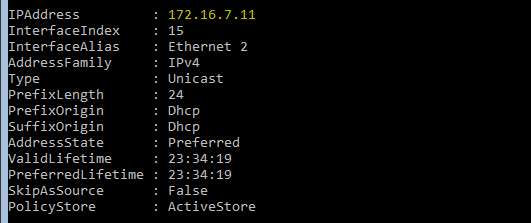
I placed my Azure Stack Dev Kit machine in another network segment. This segment is 172.16.7.0/24 as you can see above. As I have configured a DHCP server, my Azure Stack Dev Kit AzS-BGPNAT machine has received IP: 172.16.7.11

When looking at the Get-NetNat configuration however, the router believes that the externalIpInterfaceAddressSpace is still the old address space (it used to have a 172.16.5.x/24 address). So we have to update that.
When looking at the Set-NetNat command, you will notice there is no option to update the ExternalIPInterfaceAddressSpace. So we have to delete the NetNat configuration and re-add it with the correct settings. Now when we try to remove it it will give an error:

So, we need to have a workaround..
- First we need to get the “old” NAT external address
Get-NetNatExternalAddress
#(note the IP) (in my case this was 172.16.5.30)
- Set the old IP address back on the external Interface, else you cannot delete the NetNat
Netsh int ipv4 set address “ethernet 2” static 172.16.5.30 255.255.255.0 172.16.5.1
- delete the NAT
Get-NetNat | Remove-NetNat
- Set the new IP address on the external interface – 172.16.7.2
Netsh interface ipv4 set address “ethernet 2” static 172.16.7.2 255.255.255.0 172.16.7.1
- Reset the netNat configuration
New-NetNat -Name ‘BGPNAT’ -ExternalIPInterfaceAddressPrefix 172.16.7.0/24
Add-NetNatExternalAddress -NatName ‘BGPNAT’ -IPaddress 172.16.7.2 -PortStart 5000 -PortEnd 49151
and voila.. you have your router working again 🙂
(Important Note: It is completely unsupported to login to the stack infra machines through Hyper-V manager. Given there is no official guidance from Microsoft, you are on your own if this fails, or breaks things..)