There has been a lot of talking about “sovereign” clouds lately. How do you secure your data in the cloud from the CSP (cloud provider) being able to access your data and give it away to regulators? Microsoft has a very clear view on the “cloud-act” and now is working hard to make sure they cannot access your data at all. AWS provides their famous Nitro flagship stating they cannot access customer data through the hypervisor.
One way of ensuring data access is blocked, is by utilizing memory encryption in the form of “Confidential Computing”. Effectively, when a regular VM starts on a host, it gets assigned a block of physical memory from the host that the VM can use. Given the host has full access to the memory space, a memory dump from the host could reveal secrets loaded by VM’s, such as usernames/passwords/encryption keys, database contents and much more (something that AWS Nitro does not protect against, but AWS is also on the road to implementing confidential computing based on Intel TDX/SGX and AMD SEV-SNP).
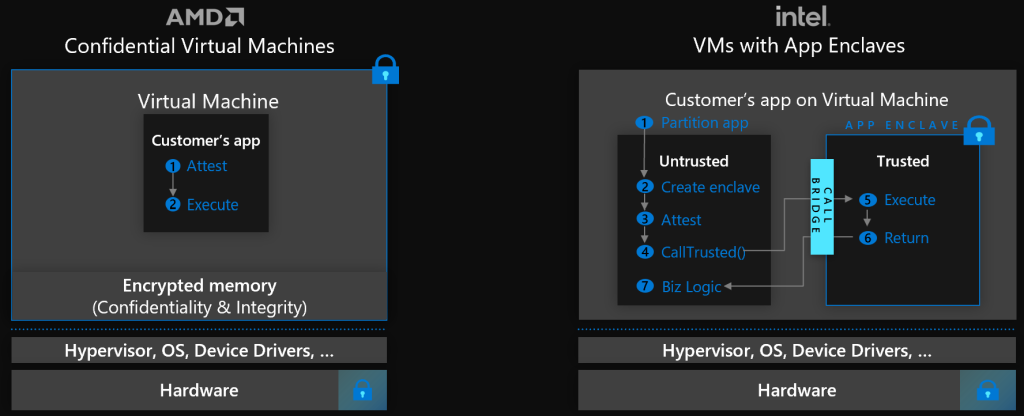
Confidential computing solves this by implementing encryption. In short, when a VM boots the host CPU creates an encryption key and that key is used for encrypting/decrypting the memory space. This means the host only sees encrypted memory and a memory dump would not reveal any information. The only components being able to read the unencrypted memory are the VM and that physical processor. Furthermore, attestation has been put in the architecture so the virtual machine can ask an attestation service if it’s actually running in a confidential configuration, allowing application developers to validate the confidentiality state prior to loading sensitive data or keys.
It’s not that hard to deploy a VM right?
Deploying a confidential virtual machine, is super easy from the portal. Just choose the right CVM SKU and deploy..
But if you want the correct configuration with all prerequisites including using confidential (OS) disk encryption, you will need to have/configure:
- A KeyVault or Managed HSM
- A Managed Identity (system or user based)
- A key with a release policy and exportable option
- Access to the key for the managed identity
- A disk encryption set using the key
- A CVM with Confidential OS disk encryption
- A data drive with (BitLocker) encryption
And this is where my new script comes in.. yes, I’ve been at it again – a full colorful script that allows you to deploy a CVM easily.. and in fact its so easy and flexible you can use it for a quick demo VM, or for production deployments with existing KeyVaults, Keys, Disk Encryption Sets, etc. It can deploy Windows (default) as well as Linux, it deploys all requirements and ultimately you end up with a fully encrypted (Windows) VM including Bitlockered E drive.
The Script
I have created a Powershell script that is available on GitHub: https://github.com/RZomermanMS/CVM/
Download the 4 files into a directory. Make sure to sign-in to Azure in a powershell window
connect-azaccountYou can use the script to deploy a simple demo VM:
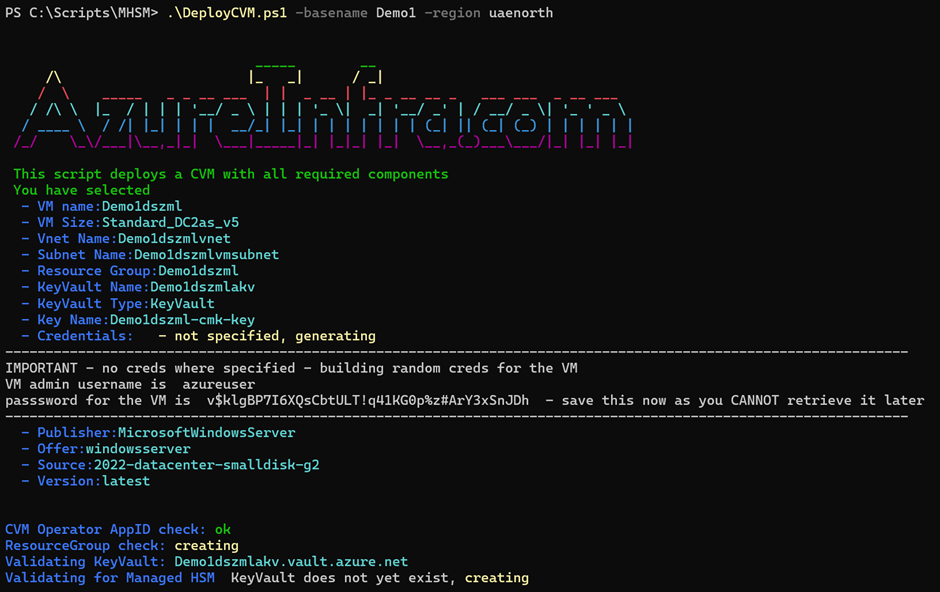
For a quick demo, you can specify a -basename which is used to build random names for all required components, including resource group, vm name, keyvault (default), keys, credentials and more. A location is always mandatory. Choose a location that has CVM’s (DCa_v5 / ECa_v5) capacity in Azure. You can also specify the vmname to determine the VM name yourself, or -VMSize to change the default DC2as_v5 to a different one. By default the script creates unique credentials, but sometimes you want your own. By providing -creds you can specify those too.
$cred=get-credential and then use -creds $cred
If you want to deploy in an existing or force a name of a new:
- resource group, just add the -resgrp option
- virtual network, just add -vnetname and -vmsubnetname
- Keyvault, just add -akvname
- Keyvault and key, just add -akvname and -keyname
- Managed HSM, just add -akvname and -akvtype MHSM and optionally -keyname
- DiskEncryptionSet, just add -desname
.\DeployCVM.ps1 -region uaenorth -vnetname FORESTROOT -vmsubnetname DC_NET -akvname Vault2 -akvtype KeyVault -resgrp CVMTEST -desname CVMDES -zone 2 -vmname CVM010 -DataDiskSize 10 -Creds $credThe above code deploys a new VM in zone 2 in the uaenorth region with CVM010 as the name, connected to subnet DC_NET in a VNET named FORESTROOT, where the disk encryption set for the OS disk is called CVMDES, using a new key in a Keyvault named Vault2 with a 10GB data disk that will be Bitlocker encrypted. And newly created components will be hosted in a resourcegroup names CVMTEST
What does it do?
All in all the following components are deployed:
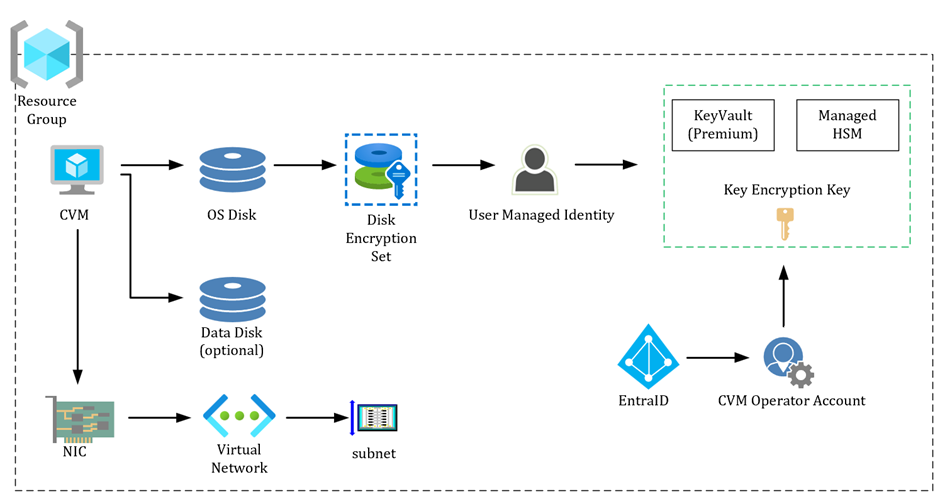
The script uses or creates a new resource group, NIC, virtual network and subnet.
A (key) encryption key is generated (or used) and stored in either KeyVault or Managed HSM (existing or created).
Access to that key is granted/validated to a user managed identity. That user managed identity is being used by a disk encryption set in combination with the target key. This allows the disk encryption set to use the key stored. But we also need to have a unique app have access to the key, so the host can start your VM securely. Which is why the script also validates (or creates) the CVM Operator application ID and its access to the Key in your vault.
When the VM is built, a new operating system disk is created with Confidential Disk Encryption enabled, utilizing the disk encryption set. Optionally a data disk can be added to the VM. This data disk is automatically encrypted with Bitlocker within the VM (if Windows). The script will print the recovery code for the data disk encryption on your screen – and you can also run this BitLocker script separately if you want to on existing VM’s.
Please be aware that we do recommend to store this recovery key also in Active Directory if applicable.
Notes to be aware of:
- When using a managed HSM stored key, make sure that the release policy for the key matches your region. The release.json file in the github is for uaenorth only, but can easily be adjusted.
- The key size is current set to 3072bits. This can be adjusted in the script