Once you have your running WVD environment based on a template, you might run into the issue where you either need to expand your pool, or you need to update the running VM’s with new software based on a new or improved template.
We’ve already discussed how to bring back your pre-Sysprepped image so you can continue working on it, in this chapter we discuss how to deploy your 2.0 version of the template, and how to expand your WVD pool.
Expanding your pool
Let’s say you have 5 VM’s already deployed but you need more capacity in the same hostpool. Obviously, you could upsize the VM’s (by kicking your users off of the VM, shutting them down 1-by-1, resizing them and starting them again) or deploy more VM’s.
When you want to deploy more VM’s using the same image you could just run another deployment of HostPools through the wizard into a new pool. But you can also extend the existing pool by providing the same hostpool name and the same VM prefix you can upscale to the number you need. Through the following form: https://github.com/Azure/RDS-Templates/tree/master/wvd-templates/Update%20existing%20WVD%20host%20pool
Open your Azure portal in one tab in your browser and copy-paste the above URL in a new tab and login with the same username/password and click Deploy to Azure:
Fill in the details similar to what you had in your previous deployment and select Decomission for the action on virtual machines. One thing to note is that the new number you put in the deployment (Rdsh Number of Instances) is the new total number of hosts available. Say you have those 5 hosts running and you want to grow to 15, make sure that in the deployment you put 15 nodes total.

The artifact location must remain the same and the SaSToken can remain empty.
For the Rdsh Image Source you can choose a CustomVHD (if you have your vhd on a blob – as per our earlier guides). You can also choose a Gallery Image or custom image. When selecting CustomVHD you will need to fill in the VM Image VHD URI as per the above example. Once you choose anything other than Gallery image, the Rdsh Gallery Image SKU entry does not matter anymore. If you choose a custom image you will need o fill in the source name and resource group containing the image. One thing to remember is that the source itself must be exactly the same as the previous deployments if the name (or prefix) of the VM’s is the same (or shortened the same). If not, you will receive the following error:

The Rdsh Name Prefix is the prefix that will be given to your VM’s. If you keep this the same as your earlier deployment, the system will continue the number scheme. For example you already have 3 VM’s deployed: RENEW-0, RENEW-1, RENEW-2 and you increase to 4 VM’s, it will deploy RENEW-3 for you. The Rdsh Number of Instances is the new total amount of VM’s that need to be in the farm. If you have 3 VM’s running and you set this to 15, the new total amount of VM’s will be 15. The disk type is the SSD/HDD for the operating system disk and the Rdsh VM size is the VM SKU to be deployed. If the size supports it, you can enable Accelerated Networking and opt-out of managed disks (although I would not recommend that).
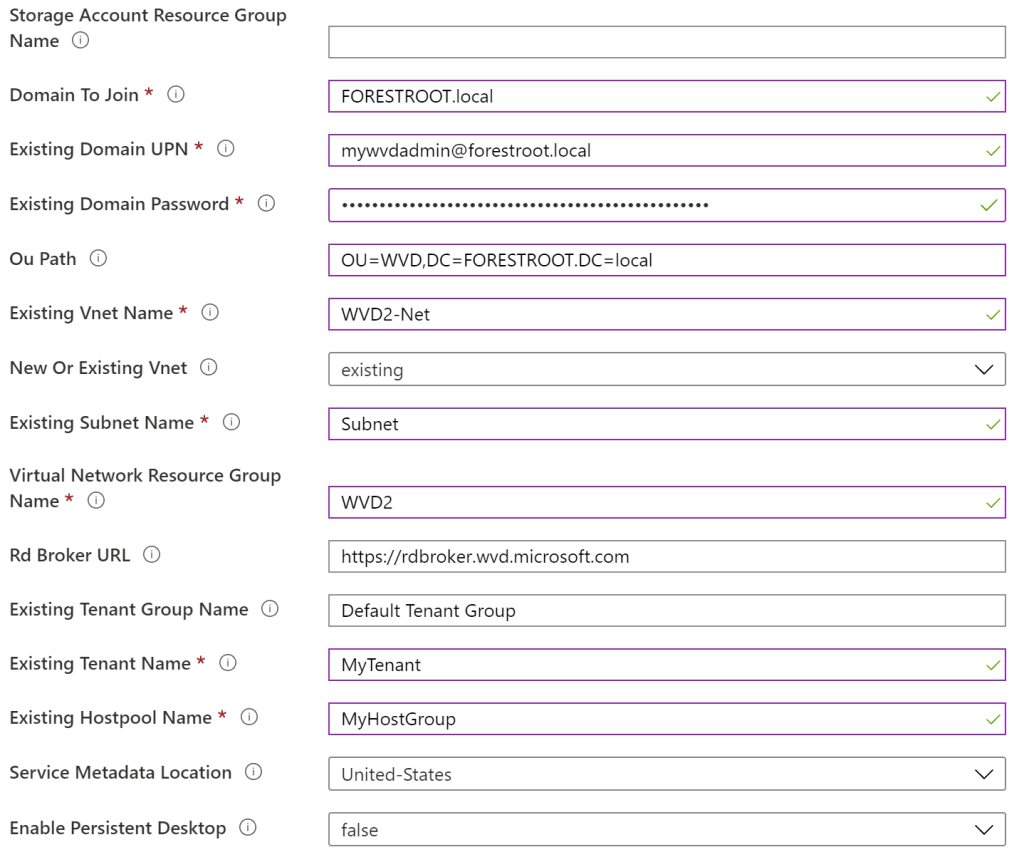
The second part of the form is the AD configuration. The admin user to join the VM’s to the domain and in which OU they must be created as well as the VNET configuration to which the VM’s must be connected in order to be able to join the domain.
Lastly, this part concludes with the WVD configuration of Tenant and Hostpool. In the last part, we need to configure the user admin / service principle to connect the VM’s to the WVD instance.
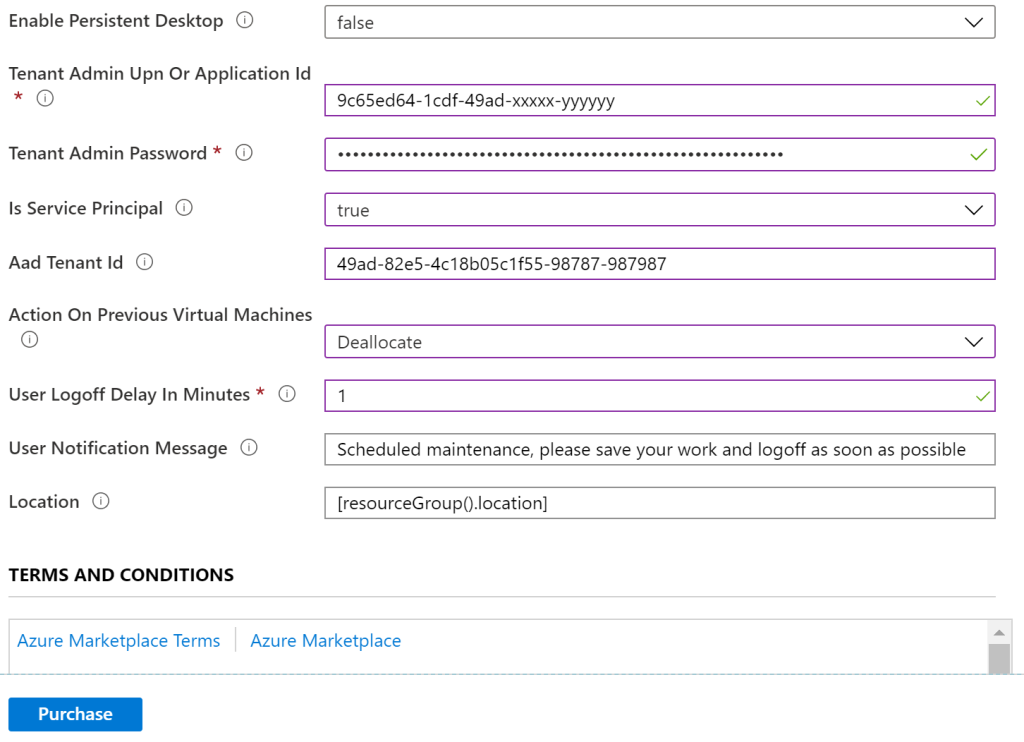
In my case I configured the applicationID used in my earlier deployments as well as the other items like AAD, password etc..
For the Action on Previous Machines, I chose Deallocate – but they will not be removed during the deployment and users can continue to work on them. Even while the User-logoff Delay is specified, in my lab I wasn’t logged off and new VM’s where just spun-up. Note that when you deploy a different image or have different settings, you might get an error on the previously deployed VM’s, but so far, in my lab the new VM’s were always added to the pool. Check the I accept and click Purchase to deploy this custom deployment. You will notice that the Deployment itself will still include the first VM’s that were already there, but it completes the configuration of these VM’s really quickly (it just validates them and continues).
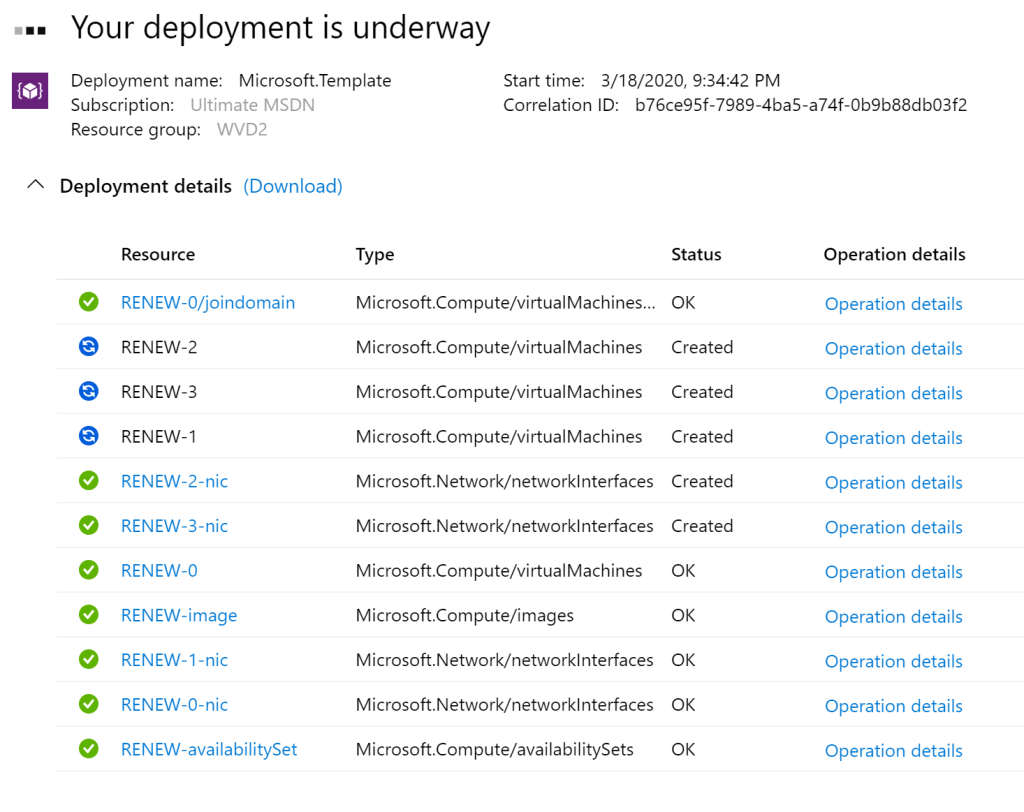
The deployment will skip the first 5 (existing nodes) and add another 10.
After deploying – validate if the nodes are added by PowerShell:
Get-RdsSessionHost -TenantName <TenantName> -HostPoolName <hostpoolname> | select SessionHostName
Renewing your image
When you provide a different source, you need to remove the previous image. You would ideally only provide a new source image if you have a newer or different template.
After each deployment you will notice that a custom image has been created in the resource group of deployment. When you try to re-deploy with a new image, you will need to remove this image. Note that as we still have the original VHD in a storage account, you can re-create this image (of a previous version) if needed.

While the above template states it will delete the old VM’s, my experience is that it does not. My advice is to expand the WVD estate with the new image (basically doubling the capacity), and then disable logging into the old VM’s to deplete them from users. Once they are empty, delete the VM’s.
Next, expand your WVD doubling the amount of VM’s required using the new template blob URL that you created.
Next, we need to disable new users from logging into the older VM’s. We can do this by issuing a command in RDS PowerShell:
Set-RdsSessionHost -TenantName $tenantName -HostPoolName $hostpoolName
-Name <hostname>.domain.local -AllowNewSession $false
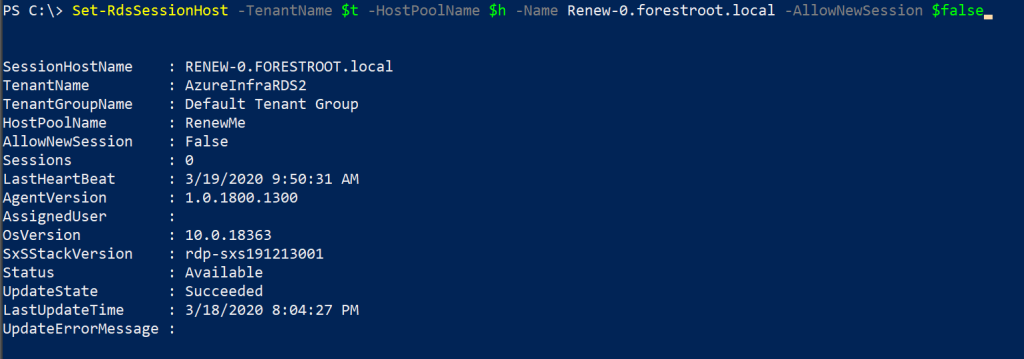
As users are logging off-on again, they will be moved to the template 2.0 version of the VM’s.
You could receive all users logged on to all your hosts using a simple command:
Get-RdsUserSession -TenantName $tenant -HostPoolName $hostpool
And if you want to forcefully remove them from the hosts, you can issue the Invoke-RDSUserSessionLogoff. If you want to filter it, you could add that to the command:
Get-RdsUserSession -TenantName $t -HostPoolName $h | where
{$_.SessionHostName -like '*4*'}
And then pipe that to a logoff command:
Get-RdsUserSession -TenantName $t -HostPoolName $h | where
{$_.SessionHostName -like '*4*'} | Invoke-RdsUserSessionLogoff -Force
Note that users will be signed-out immediately without warning!
[update] my colleague Lyes created a single one-liner to notify your users that maintenance will happen on their WVD prior to closing their session:
Get-RdsUserSession -TenantName "tenantname" -HostPoolName "poolname" | Select AdUserName,SessionHostname,SessionState,sessionid | where SessionState -eq "Active" | foreach{Send-RdsUserSessionMessage -TenantName "tenantname" -HostPoolName "poolname" -SessionHostName $.SessionHostName -SessionId $.SessionId -MessageTitle "Maintenance Activity" -MessageBody "Your VDI will be restarted for maintenance at 9:15pm, please save your work and logoff and try again in 15 minutes"}
Lastly, you can just delete the VM’s from the portal and remove the session hosts from the configuration in RDS:
Remove-RdsSessionHost -TenantName $tenantName -HostPoolName $hostpoolName -Name <hostname>.domain.local
Conclusion
You can expand your WVD estate easily using the same image by running the above script. If you need to update your image with new software and you want to run it in the same pool (or you keep the prefix name the same) you will need to delete the created image object in Azure prior to re-deploying your VM’s.
If you want to renew your existing pool (to keep current application assignments etc), expand your pool with a good amount of nodes, disable the old nodes from accepting new sessions and then either have your users move-off of the old nodes or kick them out forcefully to have them reconnect to the new image. Then you can delete the old VM’s from the portal.
Comments
One response to “Windows Virtual Desktop – Expanding and renewing”
[…] If you’ve updated your template (with new software or patches) or if you need to expand the pool of available hosts you can follow the following link: https://blog.azureinfra.com/2020/03/19/windows-virtual-desktop-expanding-and-renewing/ […]