Doing Active Directory Migrations is always tricky, certainly on applications. I’ve recently came across an application that performs an (uche 200x) based simple-LDAP bind to validate credentials. Now, we could rewrite the entire application to use SAML, OpenIDConect, Kerberos, Headers or whatever. But that’s not always possible. But how do we manage applications that do require an LDAP login where the source of the user (the actual password) could be in the source or the target forest?
We use an LDAP Proxy.
Microsoft Server has such a proxy, it’s an object item that we can create in Active Directory Lightweight Directory Service (ADLDS). The userProxy object is an actual object in ADLDS with its own distinguishedName (CN=user,OU=bla) but the object points to a SecurityIDentifier of an actual user object in Active Directory. Any authentication for that object will use Kerberos in the backend (from the AD LDS server) to Active Directory to perform the authentication.

The userProxy object in ADLDS (LDAP) only requires 2 attributes to be filled. The first being the DN (commonName + location in the LDAP store) and second the SID of the actual user in an Active Directory domain (either the one where LDAP proxy server is joined to, or a trusted one).
So, what will happen when the application sends the credentials? Now the first thing is that the application needs to authenticate the user based on the information in the AD LDS (LDAP) store. That is, the username is equal to the name of the object in LDAP or the full DN path – authentication based on other attributes can happen too (if populated) such as Name, phonenumber, or any attribute that clearly identifies the user. In my case (and to keep it a bit simple) I kept the login to the distinguishedName (the full path) to the user.
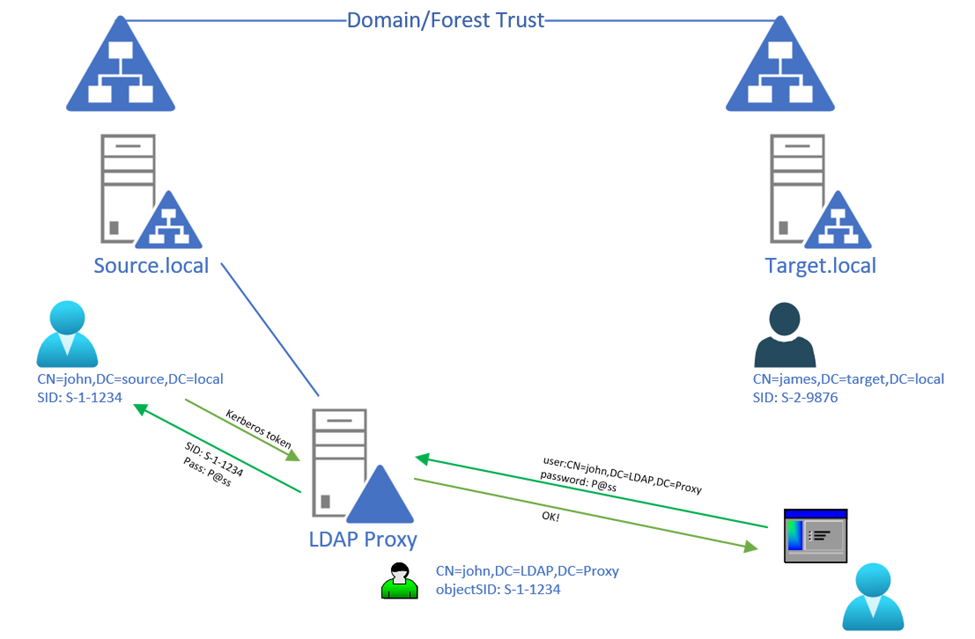
The application will also send the password that the user has provided as part of the simple BIND login. The LDAP Proxy server (ADLDS) will then convert those credentials into a Kerberos request for the objectSID attribute on that userProxy in LDAP and send that information – with the password to the domain controller ADLDS is linked to. In this case, the lookup for the domain is based on the SID domain part. But we probably need to explain that a little bit (later-on). If the domain controller finds the user object (based on SID) and agrees on the password, a successful authentication has occurred, and the application gets the OK back and the user is signed in.
SID build-up
A Security Identifier is an attribute that is usually shown as S-0-1-22-12345-13234-1234 etc. the SID is used to actually grant access to resources such as files, folders etc. While your username can change, the SID never changes. And it is built as followed:
- S-<revision>-<identifier authority>-<domain identifier>-<relative identifier>
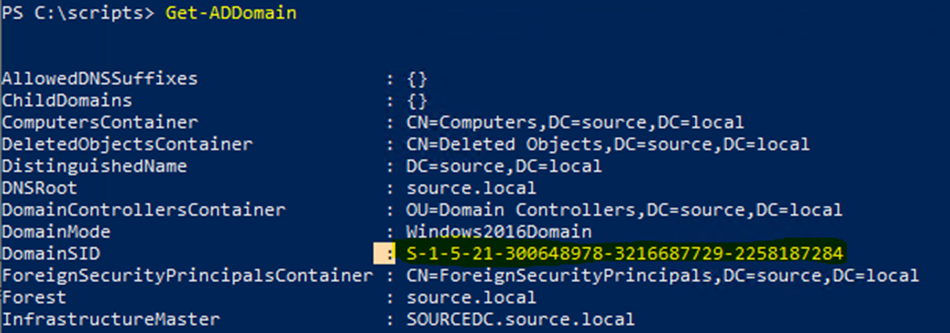
Now the identifier authority is usually 5 (NT Authority) as it’s a Windows thing anyway. The second part 22-12345-etc.. is the domain identifier and every domain has a unique identifier. This means that based on the SID we can see to which domain a SID (and thus userProxy object) belongs to.
As you can see in the following picture, my target domain has the following SID:
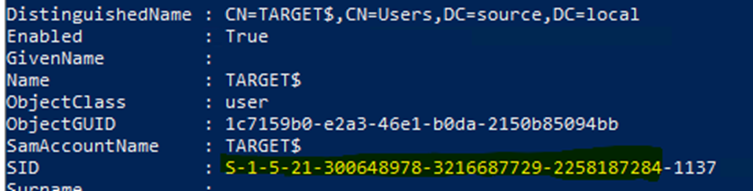
And all users in that domain have this SID in their SID embedded – which is amended by the relative identifier for that specific user:
So how do we build this?
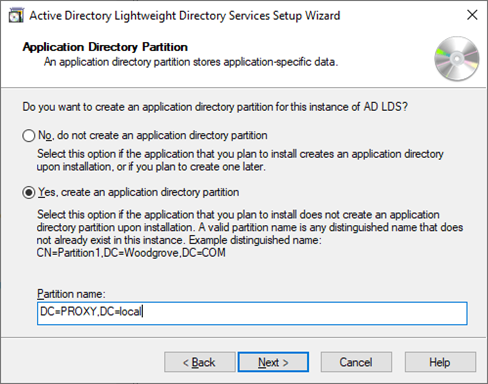
Well first we need to install AD LDS which can be done from Server Manager by adding the correct role. After adding the role, the AD LDS instance wizard comes up and allows you to provide a name for the instance and a description for a unique instance (you can make multiple copies similar to domain controllers). Provide a name (which is reflected back in services.msc as a unique service). Secondly, you need to provide the TCP ports this service will work on. By default, it will be set to 50000 and 50001 (LDAP and Secure-LDAP) but you can change it to any free port. Every LDAP server needs to have an application partition. This is where we will store the userProxy object (and other objects) and this is similar to the DC=domain,DC=com, but given it’s a full LDAP service you can also get away with o=domain,c=bla or whatever notation you would like to use. Note that his is however the basis of the DN.
Next, follow the wizard and provide the location for the (database) files, the service account under which the service should run and who should be the administrators for this instance. Finally you will get to the importing LDIF files. These are the schema files. Unlike Active Directory an ADLDS instance does not have a schema yet. An administrator can import just the right objects and attributes that are required for the function. In our example we add the MS-UserProxy.LDF. There is also an MS-UserProxyFULL.LDF file. The latter will allow more attributes to be set on the userProxy object such as Name, PhoneNumber etc. This is useful if you want to authenticate or search on those attributes.
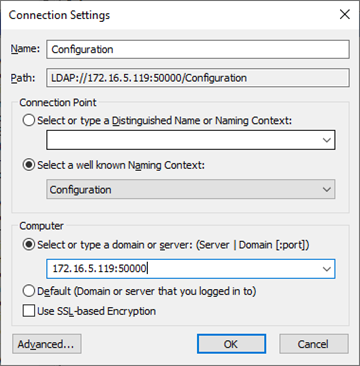
If you are not using LDAP-S (Secure LDAP) and the application is sending the password in clear-text over the wire, you will also need to lower the security standards of the instance to allow for this. Which brings us already to the interface to our instance; LDP.exe or AdsieEdit.msc I chose Adsiedit.msc and opened a connection to the Configuration Partition – and do not forget to change the server and port.
Browse to the container “CN=Directory Service,CN=Windows NT,CN=Services,CN=Configuration,CN={guid}” and bring up the properties dialog of the “CN=Directory Service” object. There is a multi-value string attribute in the attribute list called msDS-Other-Settings that lists multiple strings, each indicating a different setting for the AD LDS instance. Click on RequireSecureProxyBind and select remove, but do not delete the text yet. Edit the value to 0 and click Add again.
Next, go to services.msc and restart the AD LDS instance (it will be named to the name you gave during the installation). Next is the creation of the userProxy object. Now, this is a bit more tricky, as we need to create a new object, but we also need to have the SID of the actual user in Active Directory to link them. While you can do this manually, you can also use a PowerShell script (based on one from this blog):
function Create-ADLDSProxyObject([string] $samAccountName) {
 #we use the .Net framework wrapper for ADSI
    $output = [System.Reflection.Assembly]::LoadWithPartialName('System.DirectoryServices')
    #this is the container in LDS where the account will be created
    $userContainerPath = 'LDAP://172.16.5.119:50000/DC=PROXY,DC=LOCAL' #This is the LDS instance
    #get the users AD DS account...
    $dsUser = Get-ADUser -Filter {samAccountName -eq $samAccountName}
    if($dsUser) {
        #first create the object under the parent then set the sid
        $sid = $dsUser.SID
        $userContainer = New-Object System.DirectoryServices.DirectoryEntry -ArgumentList $userContainerPath
       $proxyObject = $userContainer.Children.Add('CN=' + $samAccountName, 'userProxy')
        $proxyObject.InvokeSet('ObjectSID', $sid.Value)
        $proxyObject.CommitChanges()
    }    else    {
        Write-Host "Failure to add account" -ForegroundColor RED
    }
}
The script above does the following: it queries the Active Directory domain for a samAccountName and retrieves the SID for that user. It then connects to your LDS instance and create a new userProxy object with CN=SamAccountName,DC=PROXY,DC=LOCAL’ and copy the SID to that object. And that’s all there is to it.
When you now want to login with your application, you would use the new DN (CN=user,DC=PROXY,DC=local) and the password of that user in Active Directory.
When you are now performing an ADMT, you want to maybe refresh those users in LDS as they move from the source AD to the target AD forest. This means the userProxy object in AD-LDS needs to be deleted and recreated with a new SID (of the user in the new forest). For this we can use the following PShell function:
function Refresh-ADLDSProxyObject([string] $samAccountName, [string] $TargetDC)
{
$output = [System.Reflection.Assembly]::LoadWithPartialName('System.DirectoryServices')
#this is the container in LDS where the account will be created
$userContainerPath = 'LDAP://172.16.5.119:50000/DC=PROXY,DC=LOCAL' #this is the LDS Instance
#get the users AD DS account...
$dsUser = Get-ADUser -Filter {samAccountName -eq $samAccountName} -server $TargetDC #TargetDC=new domain DC

if($dsUser)
{
    #First we check if we have an 'old' user with the same SID that we need to delete
    $oldUser=Get-ADObject -server 172.16.5.119:50000 -Filter {name -eq $samAccountName} -SearchBase 'DC=PROXY,DC=LOCAL' #LDS SearchBase and IP:PORT
    If ($oldUser) {
        Remove-ADobject $oldUser -Confirm:$false
    }
    $sid = $dsUser.SID
    $userContainer = New-Object System.DirectoryServices.DirectoryEntry -ArgumentList $userContainerPath
    $proxyObject = $userContainer.Children.Add('CN=' + $samAccountName, 'userProxy')
    $proxyObject.InvokeSet('ObjectSID', $sid.Value)
    $proxyObject.CommitChanges()
}
else
{
    Write-Host "Failure to add account" -ForegroundColor RED
}
}
Make sure to change the values for the actual AD LDS server IP:Port and the $TargetDC is the domain controller for the target domain (script is run from the source domain).
Conclusion
The AD LDS Proxy is awesome as a solution during Forest migrations where you still have very old legacy applications (that should have been dissolved, removed, replaced ages ago) that perform LDAP only authentications (or lookups) in a multi-distributed forest scenario.
You want to know more?
With network traces and such.. check out: Active Directory: Understanding Proxy Authentication in AD LDS | Microsoft Docs