(Not supported by Microsoft alert!)
Azure Stack uses Active Directory technologies for identity management and authentication. By default, Azure Stack has 2 modes in can operate in. It can be used in a AAD mode utilizing Azure Active Directory for identity permission assignment as well as federated authentication or it can be setup in the ADFS mode where it connects to an existing Active Directory and Active Directory Federation Service (ADFS). By default the ASDK uses only the internal Active Directory and Federation service, which means that you need to create local users on the AzS-DC01 (or azurestack.local AD) and you cannot use your own (existing) AD for assigning permissions..
In this post we will be looking at integrating ASDK to an external Active Directory and ADFS service while the ASDK is in the ADFS mode. After this configuration you can actually assign users from your own AD and sign-in using your corporate credentials into the ASDK instead of the users in the ASDK AD itself. This guide assumes you already have an Active Directory in place including an ADFS service and that you installed ASDK in ADFS mode.

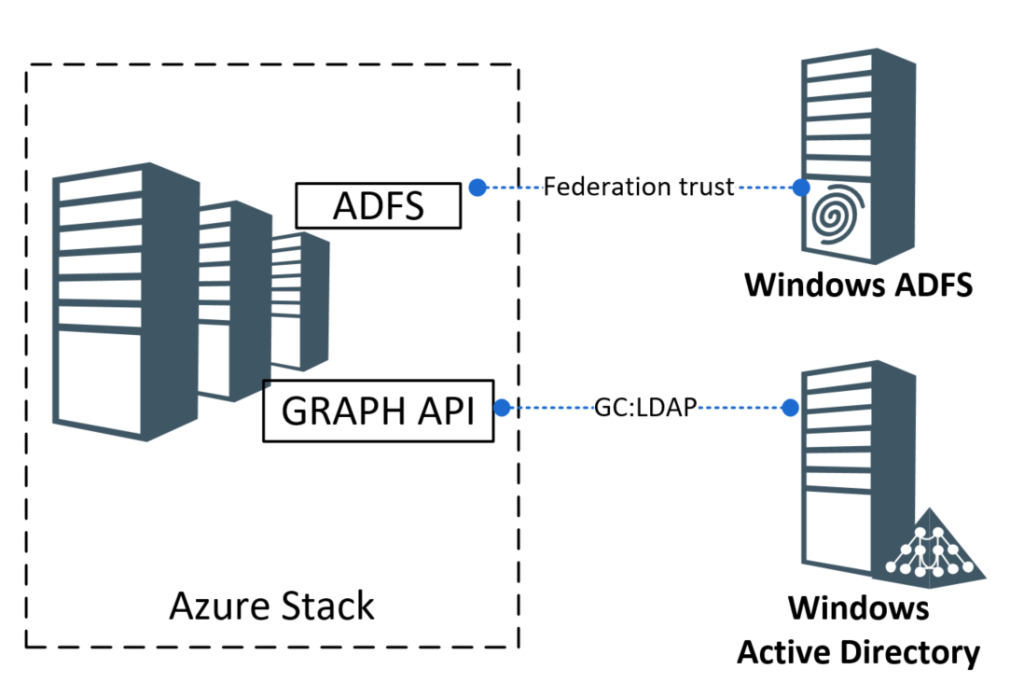
Azure Stack exposes two main services that need to be kept in focus when designing the integration. The first is the authentication service through ADFS. This service can be paired with another Windows ADFS based service outside of the Azure Stack physical box. The second service is the GraphAPI. This is the API that is responsible for searching and selecting users when assigning permissions. The GraphAPI is connected to an Active Directory and searches the user based on username (domainname\username) or UPN (user@domain) and groups on group names.
Initial (Network) Configuration
In my previous posts I already showed how you can configure ASDK to use routing instead of NAT and how to setup BGP.
To start the configuration you will first need to setup the ASDK in ADFS mode. Then you remove the NAT configuration and configure BGP (optional).
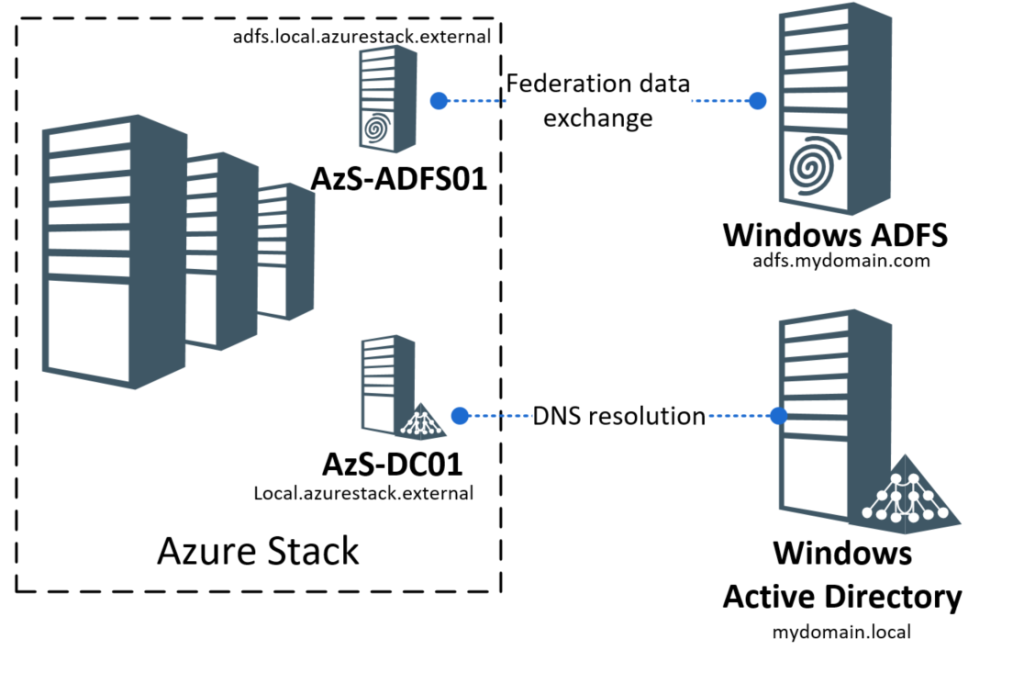
The first task at hand is to configure the DNS service so that the Azure Stack can find your ADFS and Domain Controller and that your ADFS service can find your Stack ADFS service. This means that we will need to ensure that the Stack DNS server can find your AD DNS and that your AD DNS can find the DNS for Azure Stack. For this we have to do 2 things:
- Setup L3 routing (if you used BGP – skip if you used static routes)
- After you configured BGP you will notice that the AzS-BGPNAT will only provide /32 addresses to your router/switch, not the entire /24 subnet. because of this, you are missing vital IP addresses that need to be routed (the domain controller and the ADFS server in ASDK)
- Logon to the AzS-BGPNAT01 and add the internal subnet to the BGP tables typing:
- Ipconfig (note the internal IP address space – usually 192.168.200.0/24 (in my examples I’ve changed it to 172.16.3.0/24)
- Powershell
- Add-CustomBGProute -Interface <AzS-BGPNAT01 external interface name> -Network 172.16.3.0/24
- This ensures that the entire /24 range will be passed to your router/switch by the BGP setup
- If all is well, you should now be able to ping your AD domain controller from the AzS-ACS01 and vice-versa
- Setup Conditional forwarders on both ends
- On the ASDK host
- ping AzS-DC01 and note the IP address
- open the Administrative Tools and start DNS manager
- Right click the local name and add the AzS-DC01 on IP address to the console
- On the IP address of AzS-DC01, expand the server and select conditional forwarders
- Add a new forwarder with the name of your domain in FQDN and the IP address of one or more domain controllers
- (if your ADFS uses a different domain name, ensure it also forwards / is capable of looking up that name too)
- On your Active Directory Domain Controller (management server)
- Open the Administrative Tools and start DNS manager
- Expand the server and select conditional forwarders
- Add a new forwarder with the name local.azurestack.external and the IP address of AzS-DC01
- (If you have multiple domain controllers, it might be worth to select – Replicate throughout the AD)
- On the ASDK host
The configuration
The GraphAPI in Azure Stack will need to connect to your Active Directory LDAP and therefore needs to authenticate before it can read objects and attributes from your forest.
- Create a new user in your Active Directory for the GraphAPI to use
- On the ASDK box, open a powershell window and type:
- Ping AzS-ERCS01
- to get the IP address of the ERCS server
- To authenticate to the ERCS server, you need to have the ASDK credentials (use AzureStack\CloudAdmin) and the ASDK password
- $creds = Get-Credential
- and then open a session to ERCS using:
- Enter-PSSession -ComputerName <AzS-ERCS01 IP> -ConfigurationName PrivilegedEndpoint -Credential $creds
- Once you have the session the first task is to set the GraphAPI to look at your AD rather than the ASDK AD when assigning permissions
- Register-DirectoryService -CustomADGlobalCatalog<yourforestFQDN>
- The command will ask you for credentials, upon which you should provide the username you create in your AD for the GraphAPI
Now that the GraphAPI is looking at your AD, you will also need to authenticate to Azure Stack. For this, you will need to setup the Federation Services. To set it up you will add a new Claims Provider to the local (ASDK) ADFS service. To ease the setup, you want run a single command to fetch all the required information from your ADFS Federationmetadata.xml URI. If you have a public URL (not similar to your AD FQDN), make sure you have added these forwarders in the DNS too. A simple test is to ping the name of the external ADFS based on its actual name from the ASDK host (or just open it from Internet Explorer on the ASDK host).
Note that your ADFS certificate will need to be trusted by the AzS-ADFS01 server as well as clients that use it to login. If your certificate is not trusted, you must add the root/intermediate authority certificates of your ADFS service into AzS-ADFS).
- While still logged in to the ERCS session type:
- Register-CustomAdfs -CustomAdfsName MyCustomADFS -CustomADFSFederationMetadataEndpointUri https://<federationURL>/federationmetadata/2007-06/federationmetadata.xml
- The command will connect to the federation endpoint and read all the attributes and settings and then sets up the internal ADFS to automatically forward all users to your ADFS service instead of the ASDK ADFS service
- Given we will use an external AD, it means that the local users (AzureStackAdmin/CloudAdmin/etc) will not be able to login to the portal anymore. We have to assign a new ASDK administrator which we do by issuing the following command in the ERCS01 session:
- Set-ServiceAdminOwner -ServiceAdminOwnerUpn “administrator@contoso.com”
- Obviously the UPN stated should be available in your (source) Active Directory (the UPN does not need to match your domain FQDN, but can be an alternate UPN)
The Stack part of the configuration is done, but we will still need to configure our ADFS service to trust the ASDK to be able to issue authentication tokens. The process is a bit cumbersome, but fairly easy.

- First we need to ensure our ADFS service trusts the ASDK ADFS farm. And given it was (most likely) using self-signed certificates, we need to export the root certificate and intermediate certificate from the ASDK host
- Login to the ASDK host and open MMC.exe
- Add the Certificates (Computer/Localhost) to the console
- You will need to export the AzureStackSelfSignedRootCert, the AzureStackSelfSignedIntermediate1Cert and AzureStackSelfSignedIntermediate2Cert
- for each of the above 3 certificates
- click All Tasks – Export – next
- Select: No I do not want to export the private key
- DER encoded
- Save the file to a location using the name you like
- copy the files to your ADFS server
- for each of the above 3 certificates
- You now have the certificates that build the trust chain to the ASDK ADFS server, these need to be imported in the Trusted Root Authorities and Intermediate Certification Authorities stores in your ADFS server
- Open MMC.exe and add certificates (Computer / Localhost)
- Go to the Trusted Root Certification Authorities and open Certificates
- Right click certificates and select all tasks / import
- Import the root AzureStackSelfSignedRootCert
- Go to the Intermediate Certification Authorities and open certificates
- Right click certificates and select all tasks / import
- Import AzureStackSelfSignedIntermediate1Cert and the AzureStackSelfSignedIntermediate2Cert certificates
- You can test the certificate chain by browsing on your ADFS server to: https://adfs.local.azurestack.external/FederationMetadata/2007-06/FederationMetadata.xml (there should be no certificate warning)
- Next is setting up the Relying Party Trust (allowing your ADFS to provide tokens for Azure Stack)
Copy the following text in a text file and save it on your (primary) ADFS server as C:\ClaimIssuanceRules.txt
@RuleTemplate = "LdapClaims"
 @RuleName = "Name claim" c:[Type == "http://schemas.microsoft.com/ws/2008/06/identity/claims/windowsaccountname", Issuer == "AD AUTHORITY"] => issue(store = "Active Directory", types = ("http://schemas.xmlsoap.org/ws/2005/05/identity/claims/name"), query = ";userPrincipalName;{0}", param = c.Value);

@RuleTemplate = "LdapClaims"
 @RuleName = "UPN claim" c:[Type == "http://schemas.microsoft.com/ws/2008/06/identity/claims/windowsaccountname", Issuer == "AD AUTHORITY"] => issue(store = "Active Directory", types = ("http://schemas.xmlsoap.org/ws/2005/05/identity/claims/upn"), query = ";userPrincipalName;{0}", param = c.Value);

@RuleTemplate = "LdapClaims"
 @RuleName = "ObjectID claim" c:[Type == "http://schemas.microsoft.com/ws/2008/06/identity/claims/primarysid"] => issue(Type = "http://schemas.microsoft.com/identity/claims/objectidentifier", Issuer = c.Issuer, OriginalIssuer = c.OriginalIssuer, Value = c.Value, ValueType = c.ValueType);
 @RuleName = "Family Name and Given claim" c:[Type == "http://schemas.microsoft.com/ws/2008/06/identity/claims/windowsaccountname", Issuer == "AD AUTHORITY"] => issue(store = "Active Directory", types = ("http://schemas.xmlsoap.org/ws/2005/05/identity/claims/surname", "http://schemas.xmlsoap.org/ws/2005/05/identity/claims/givenname"), query = ";sn,givenName;{0}", param = c.Value);

@RuleTemplate = "PassThroughClaims"
 @RuleName = "Pass through all Group SID claims" c:[Type == "http://schemas.microsoft.com/ws/2008/06/identity/claims/groupsid", Issuer =~ "^(AD AUTHORITY|SELF AUTHORITY|LOCAL AUTHORITY)$"] => issue(claim = c);

@RuleTemplate = "PassThroughClaims"
 @RuleName = "Pass through all windows account name claims" c:[Type == http://schemas.microsoft.com/ws/2008/06/identity/claims/windowsaccountname] => issue(claim = c);
- Open up an elevated Powershell prompt and type:
- Set-AdfsProperties -IgnoreTokenBinding $true
- If you have ADFS 2016 enter the following:
- Add-ADFSRelyingPartyTrust -Name AzureStack -MetadataUrl “https://adfs.local.azurestack.external/FederationMetadata/2007-06/FederationMetadata.xml” -IssuanceTransformRulesFile “C:\ClaimIssuanceRules.txt” -AutoUpdateEnabled:$true -MonitoringEnabled:$true -enabled:$true -AccessControlPolicyName “Permit everyone”
- If you have ADFS 2012 R2 enter:
- Add-ADFSRelyingPartyTrust -Name AzureStack -MetadataUrl “https://adfs.local.azurestack.external/FederationMetadata/2007-06/FederationMetadata.xml” -IssuanceTransformRulesFile “C:\ClaimIssuanceRules.txt” -AutoUpdateEnabled:$true -MonitoringEnabled:$true -enabled:$true
- Type
- Set-ADFSRelyingPartyTrust -TargetName AzureStack -TokenLifeTime 1440
- By default the ADFS will try to do Windows Integrated Authentication which will cause an NTLM pop-up for non-(your) domain joined devices. This window can be behind your IE screen. In order to force a Forms Based Login you can run the following command:
- Set-AdfsProperties -WIASupportedUserAgents @(“MSAuthHost/1.0/In-Domain”,”MSIPC”,”Windows Rights Management Client”)
And that is it!.. you should now be able to open: https://portal.local.azurestack.external and redirection to your own ADFS should follow. If you want to make sure that the portal works on all your devices (not just the ASDK host), make sure to import the 3 certificates on all your devices/workstations and that you add additional DNS names in to the conditional forwarders towards AzS-DC01
- local.azurestack.external
- local.cloudapp.azurestack.external
