Some people have had some trouble with the F5 demo I posted about where we can inject additional HEADERS based on an external LDAP store. While this post specifically goes into setting up the LDAP store for that, it can also be used for any Active Directory LDAP deployment.
First let’s start with a standard Windows 2019 server. As I do want this LDAP to be completely standalone I don’t join it to the domain and leave it standalone. In order to speed up the installation I gave it 4 processors and 4Gb of RAM. After the basic installation I updated the OS with the latest patches and here is where we begin our journey.
Adding a local group
As I do not like single users being able to administer services I want to use a group so I have a bit more control in the future. For this, let’s add a new local group to the server called F5-LDS-Admins and add our administrator into that group. This can be done via the GUI or via cmd/Pshell.
New-LocalGroup -Name "F5-LDS-Admins"
Add-LocalGroupMember -Group "F5-LDS-Admins" -Member Administrator
Don’t forget to sign-out and sign-in again to make the changes in group membership active.
Installing Roles and Features
Through Server Manager we can add the role Active Directory Lightweight Directory Services, selecting it will give us a pop-up for the features to be added, just click Add Features
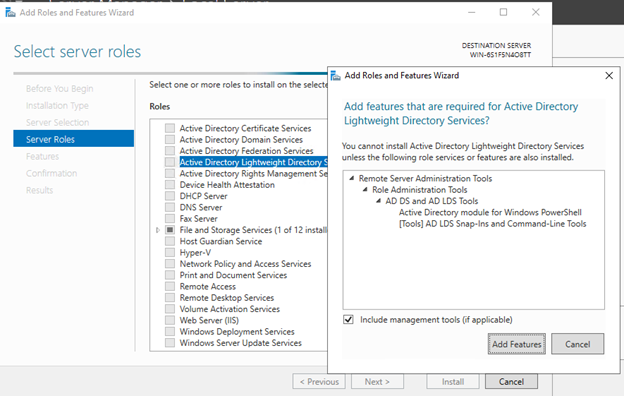
Clicking Next, Next, Next and Install will ultimately install the roles and features required.
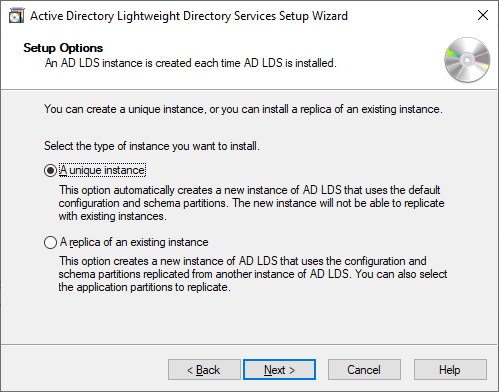
After the installation of the role and features, the wizard will ask you to Run the Active Directory Lightweight Directory Services Setup Wizard. Click the link and it will start the wizard where we can click next on the welcome screen.
Now AD LDS works similar to regular Active Directory. You can have a multi-master system setup where multiple instances can replicate amongst themselves. In our case we want to create a unique instance
Next is the name of the instance. You can make it any name and this name will show in the Services console on the computer. As you can host multiple instances on a single computer it is used to just identify which instance you are working with. I just change the Instance Name to F5-header and the description to F5-Header-Injection-LDAP-Source

Next is the port number. As with any service, it will listen on a port number on network interface. By default ports 389 and 636 (SSL) will be chosen. If you run multiple instances on the same computer you will need to change the port numbers to a “free” port on the computer. I leave the defaults and go Next
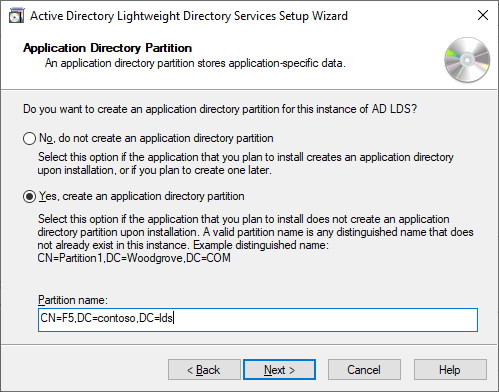
Which is the partition name. Now the partition name is important here. Just like in Active Directory a standard Schema and Configuration partition exist, but the Default partition does not. So in this case we want to create a new partition, and we have to do this in a DistinguishedName format. In my case I chose CN=F5,DC=contoso,DC=lds
Next is the location for the database. I leave it as default and just click Next to get to the Service Account selection. You can run the LDS instance on any service account, but I leave the defaults so it’s a Network Service Account and click Next. As this server is not in the domain (and I do not want it replicating to other servers) just click Yes on the pop-up.
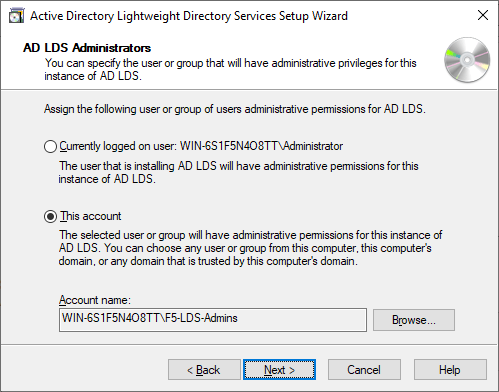
The next question is who will get access to the instance. This means administrative access. By default, this is the local Administrator account (or at least the account running the wizard), but you can select other accounts as well. In our case we created the F5-LDS-Admins group that we want to grant access. So choose This Account and click Browse to then select the F5-LDS-Admins group.
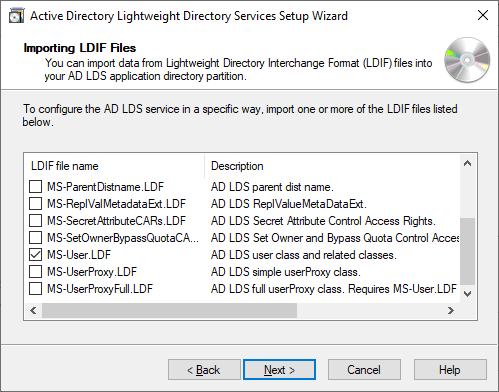
Which brings us to the schema to be used. Now the schema defines the object types and attributes available in our directory. While directories can host users, they can also host application specific objects and attributes and the wizard will show you a few example schemas you can import already. As we will be working with user objects and their attributes, we will add the MS-User.LDF as this schema will have object properties like userPrincipalName, etc.
Finally, review the selection overview and click Next to start installing and importing the schema.
Now if you did not re-login to make the changes in your group membership active, you will not be able to login to the instance. Don’t worry, let the wizard complete and then logout of the system. We can still apply the schema later.
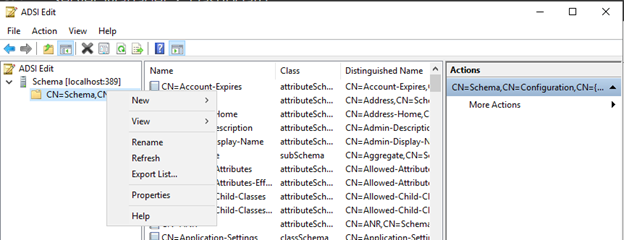
Now lets take a look in our LDAP server. Through Administrative Tools you have access to Adsiedit a simple LDAP tool. Open it and right click the ADSI Edit branch on the left side of the window and click Connect to…. The first thing we want to do is to connect to the Schema as we will need some information from there. For this, under the connection point change the Default naming context to Schema and the under Computer type Localhost. If you have changed the default 389 port, make it localhost:<port> and then click OK to connect.

Once connected it will show you the schema. The schema is already preloaded with the MS-User.LDF file (if that process worked – if not – stay with me here.. we will load it later). As we will need to load other attributes in the schema we need to know the DistinguishedName (also referred to as DN) of the schema. For this, right click the CN=Schema,CN=Config… folder on the left side and select properties (you might need to double click on it first to open the Classes on the right side before Properties shows up)
Once you have opened the properties, you can see the details of the Schema object itself, including the distinguishedName
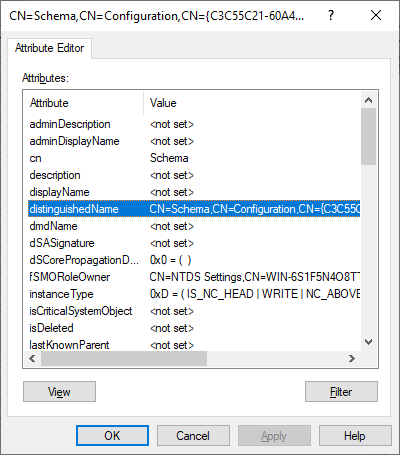
Now as you can see, the first part of the schema seems similar to the one you might know from Active Directory (CM=Schema,CN=Configuration,) but the last CN is actually a GUID which is unique to each installation. Hence, we need to copy this GUID before we can import other attributes. In my case the DN is CN=Schema,CN=Configuration,CN={C3C55C21-60A4-4052-A030-8ACE444FC2A5} so you can replace any of the below commands with your specific Schema DN.
Next, download the PartnerIDandRole.ldf from my GitHub and place it under a new directory C:\Scripts which you can do with a single command in PowerShell
Invoke-WebRequest -UseBasicParsing -Uri https://raw.githubusercontent.com/RZomerman/F5/master/PartnerIDAndRole.ldf -OutFile c:\scripts\PartnerIDAndRole.ldf
Then we can start the import. This can be done easily with a tool built-in to the Operating System, LDIFDE. Open a command prompt and then
If you have forgotten to re-login and need to import the MS-User.LDF schema follow the next steps:
Go to C:\Windows\ADAM and execute the following
C:\Windows\ADAM>ldifde -i -v -f MS-User.LDF -s localhost -j c:\scripts -c CN=Schema,CN=Configuration,DC=X CN=Schema,CN=Configuration,CN={C3C55C21-60A4-4052-A030-8ACE444FC2A5}
Make sure that you change the last GUID entry to the actual GUID you got from the earlier step (the DN of the Schema)
To import the custom attributes PartnerID and RoleDescription use the downloaded file and import it with the following command from the c:\scripts folder:
ldifde -i -v -f PartnerIDAndRole.ldf -s localhost -j c:\scripts -c CN=Schema,CN=Configuration,CN=X CN=Schema,CN=Configuration,CN={C3C55C21-60A4-4052-A030-8ACE444FC2A5}
This takes care of our schema parts. Next is the creation of users and enabling them. While we could still login to the service using our Windows LDAP administrators group membership, we might want to use the LDAP store only. So let’s create our users:
User Creation
There are multiple options for creating the accounts, one is to create them through an LDAP provider (like ADSI edit), but powershell works just as well, and we can add the required attributes in a single, ok two, commands:
$my_secure_password = convertto-securestring "mySecur3P@ssw0rd" -asplaintext -force
New-ADUser -Path "cn=f5,dc=contoso,dc=lds" -Server localhost:389 -Name MyUser -DisplayName MyUser -AccountPassword $my_secure_password -UserPrincipalName myuser@domain.com -OtherAttributes @{'PartnerID'='12345'} -Enabled $True
This single command creates the user, sets the UPN and PartnerID for the user and enables the account (by default all created accounts in LDS are disabled). So let’s dive into the LDAP version of this.
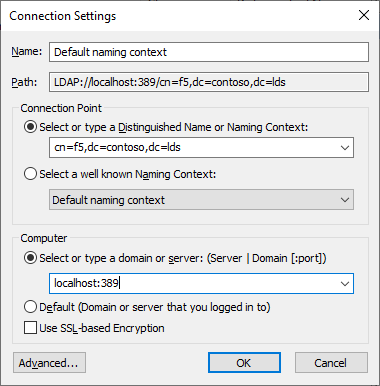
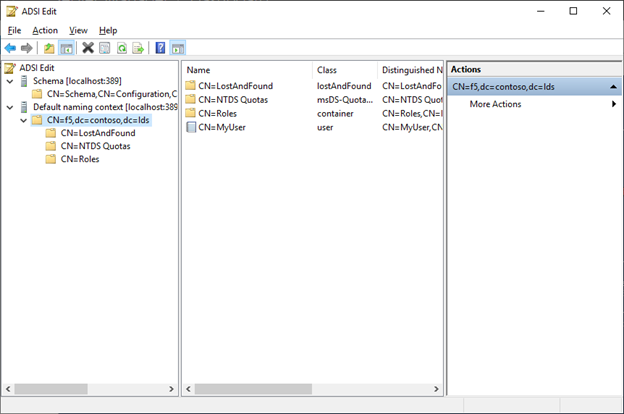
Open ADSI Edit and right click the ADSI Edit pane on the left to select Connect to… In the pop-up window under the Connection Point under select or type the Distinguished Name or Naming Context type the DN of our instance CN=f5,DC=contoso,DC=LDS and under Computer type localhost:<port>
You will be connected to the Default Naming context (f5,contoso,lds) where we have added our users in the previous command. By default, you will see 3 containers there, LostAndFound, NTDS Quotas and Roles. When you have opened the Default naming context and the DN of our instance you will also see the CN=MyUser in the root. As we did not create OU structures all users by default will go to the root of the naming context.
So, let’s add our F5APM user into this using the same PowerShell command used earlier,
New-ADUser -Path "cn=f5,dc=contoso,dc=lds" -Server localhost:389 -Name f5apm -DisplayName F5APM -AccountPassword $my_secure_password -UserPrincipalName f5apm@domain.com -Enabled $True
Now one thing to know is that regular users will not be able to login to the system to read other’s people attributes (similar to AD), instead we have to grant Reader permissions to the F5APM user. For this we need to grab the distinguishedName of the F5APM user. While we could simply populate it ourselves, just right click the user in the ADSI Edit window and select properties. Then look for distinguishedName and copy its value. It should look like CN=f5apm,CN=F5,DC=contoso,DC=lds.
Next go into the CN=Roles and select the CN=Readers role and open its properties. Then search for the attribute Member and double click. The new window will allow you to add users based on DN and paste the DN from the f5apm user:
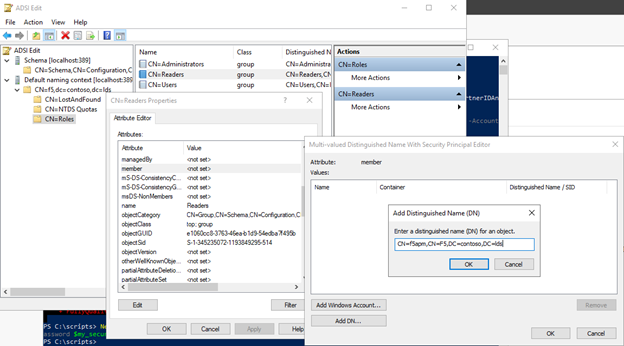
Click ok and you are done!
If you used a custom port, you might need to open the firewall port for it…